HyipNir Documentation
AI Based Complete HYIP Investment With Staking Platform
HyipNir is an AI-Based, complete HYIP investment With Staking Platform built on advanced PHP Laravel technology. It includes everything you need to launch a professional investment business. Simply purchase, install on your server, configure your settings, and start your business.
HyipNir is a AI Based Complete HYIP Investment With Staking that includes all the necessary functions of a HYIP website already. HyipNir offers HYIP Investment, AI Content Generator & AI Chatbot, Staking, Multi-Level Referral, Level Ranking Rewards, Automated ROI, Automated profit calculation, Real-time profit tracking, Withdrawal Holiday, and Return/Profit Holiday Features and withdrawals. Just purchase, install on your server, configure your settings, and start your business. understand the functions by looking at the documentation. HyipNir is built on advanced PHP Laravel technology. HyipNir The user can deposit the balance into their account and then invest by using the balance in any Plan of their choice. The user will be able to invest directly in the plan of their choice. It’s a website for investment that can be used for investment Plan purposes.
Users can receive the Signup Bonus for registering on the website. It has various referral levels to get the multi-referral commission: Investment Referral Bonus and Interest Referral Bonus. When a customer shares their affiliate link with another customer, they earn a bonus. And the customer will receive the amount of bonus that the admin has set for the level from the dashboard when making a deposit or investment. This affiliate system will help one customer attract another customer to invest. The user will be able to see their profit, bonus, and referral commission, which will all be deposited in the user account. If the user wants, he can withdraw his balance directly, OR invest by using the balance in any plan of their choice. It is an SEO-friendly, architectural, and secure website.
Users can deposit funds and invest in any plan of their choice — either via account balance or directly. All profits, bonuses, and referral commissions are automatically credited to user accounts. Funds can be withdrawn instantly or reinvested into any plan.
Frequently Asked Questions
No. This platform works properly on shared hosting. However, for high traffic volumes, upgrading your server is recommended. Our platform is extensively optimized for performance.
Any hosting provider offering cPanel-based hosting works. We recommend cPanel-based hosting for the easiest setup experience. Free installation support is available for cPanel hosting only.
No worries — HyipNir can be used with any control panel. However, our free installation support is only available for cPanel-based hosting. We suggest cPanel for the most seamless experience.
Yes, absolutely! We'll help you complete the installation. Simply contact us at info@softnir.com and our team will assist you promptly.
Built With the Best Stack
- Powered by PHP Laravel, Bootstrap, and jQuery — the most secure, scalable, and future-proof technology stack available.
Server Requirements
Minimum Requirements
- ✓
PHPVersion 8.2+ - ✓
MySQL5.7+ / MariaDB 10.2+ - ✓
BCMATHExtension - ✓
CTYPEExtension - ✓
FILEINFOExtension - ✓
JSONExtension - ✓
MBSTRINGExtension - ✓
OPENSSLExtension - ✓
PDOExtension - ✓
PDO_MYSQLExtension - ✓
TOKENIZERExtension - ✓
XMLExtension - ✓
CURLExtension - ✓
GDExtension
Installation Process
Follow these simple steps to install HyipNir on your server. No coding knowledge required.
Step 1 — Upload Files via cPanel
Access your cPanel account and go to File Manager.
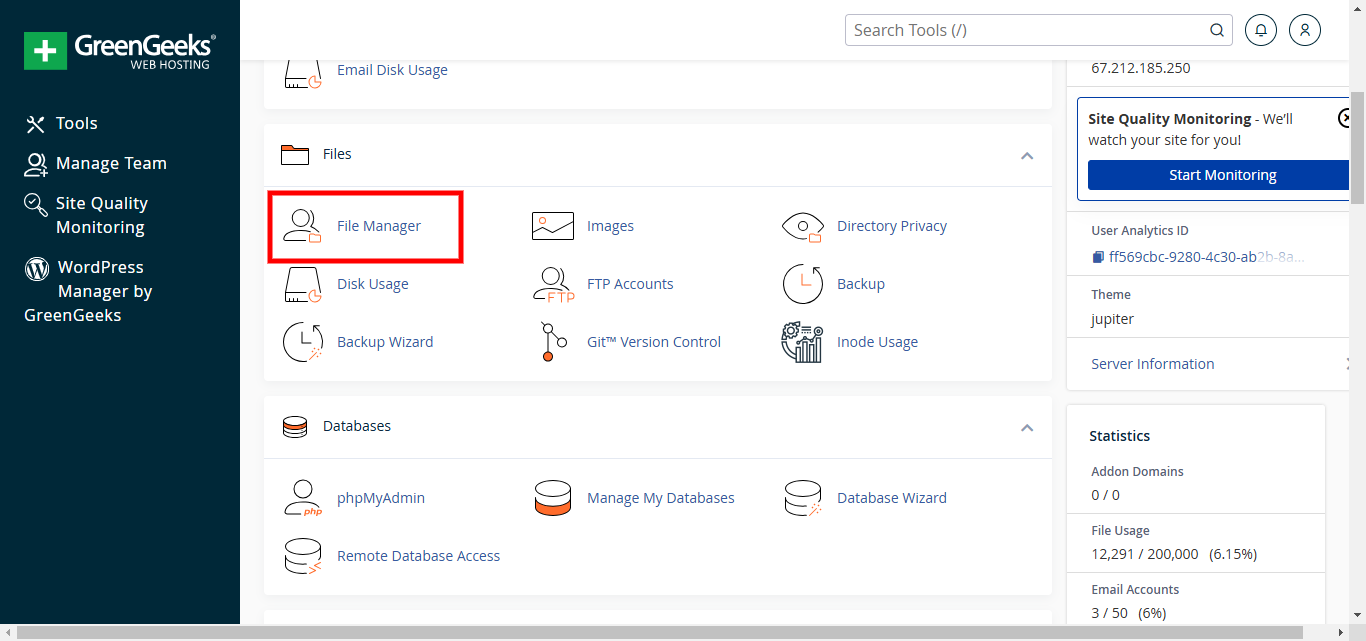
Navigate to the public_html folder.
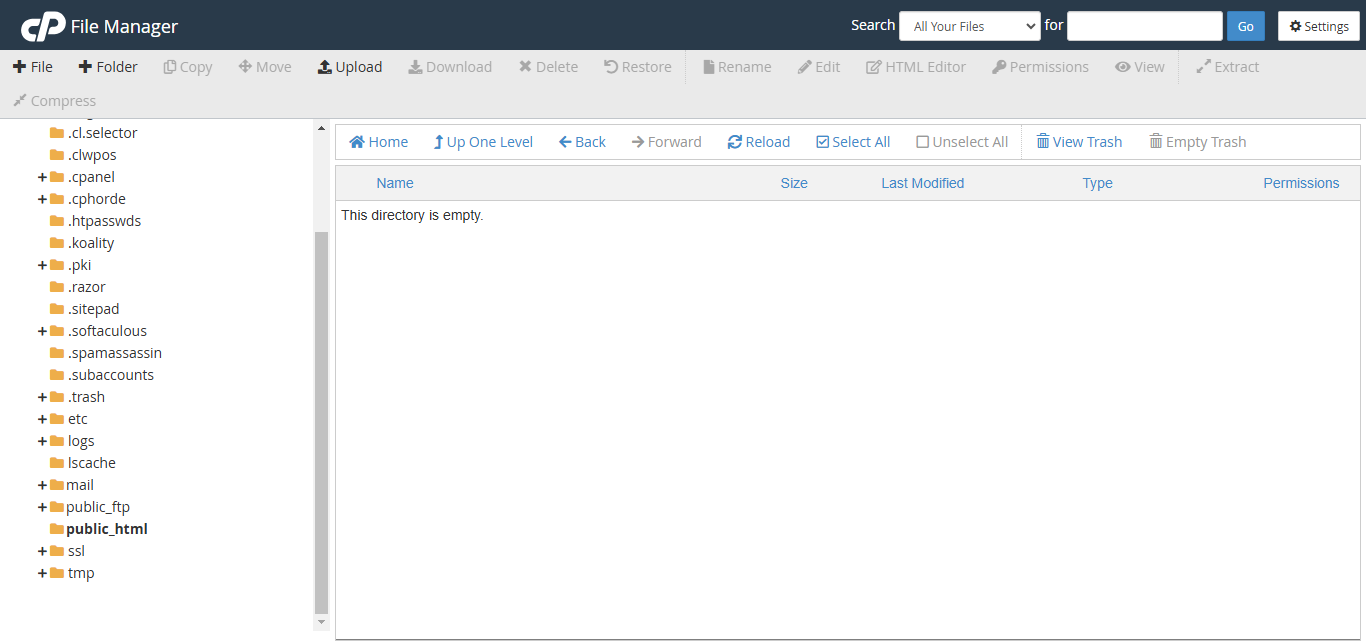
Click Upload and select the HyipNir zip file you downloaded after purchase.
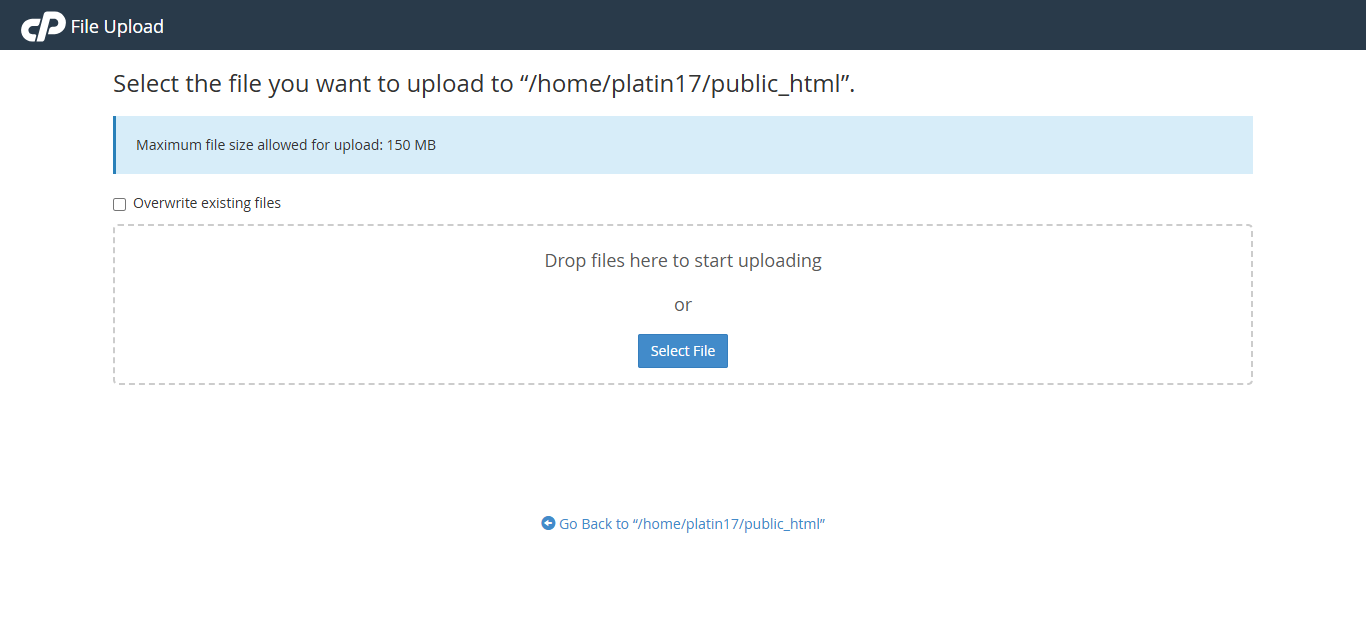
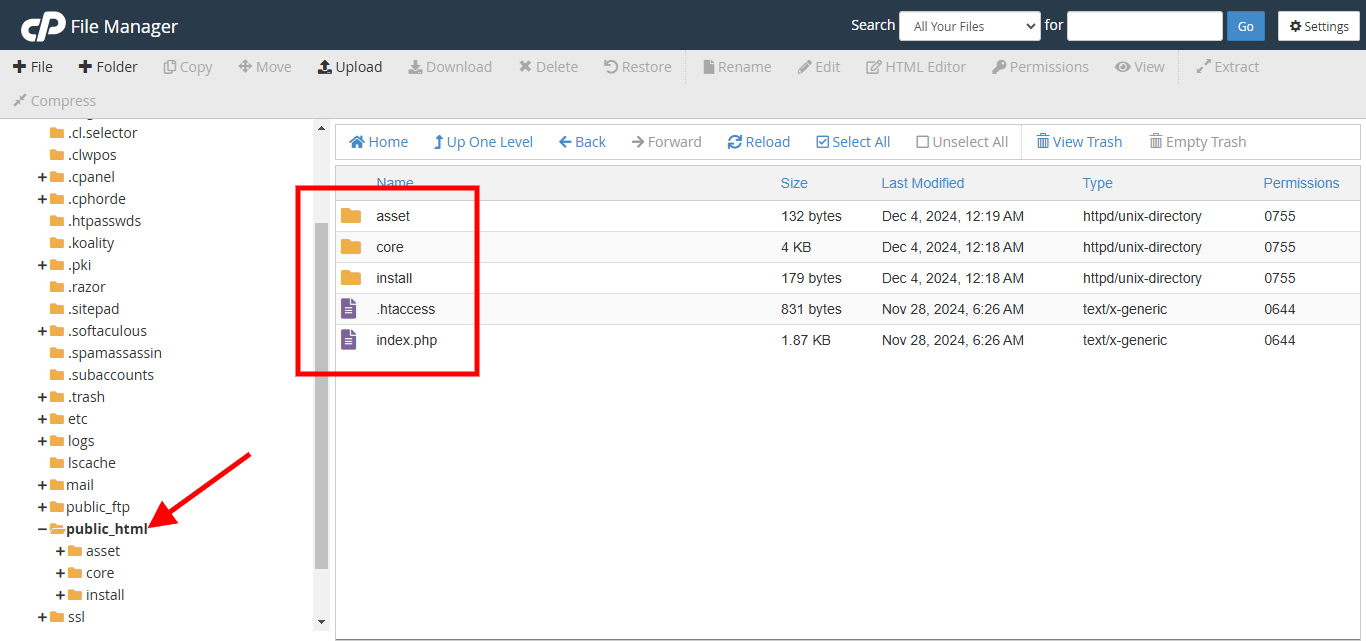
public_html. Ensure asset, core, install, .htaccess and index.php are all moved correctly.Extract/Unzip: Upload the zip file to the extract/unzip the file and move all files inside files folder to the main folder(where you want to install it). Most likely "public_html" will be your root folder on your cPanel enabled server. Make sure you have moved the ( asset, core, install, .htaccess and index.php ) as well.
Step 2 — Create Database
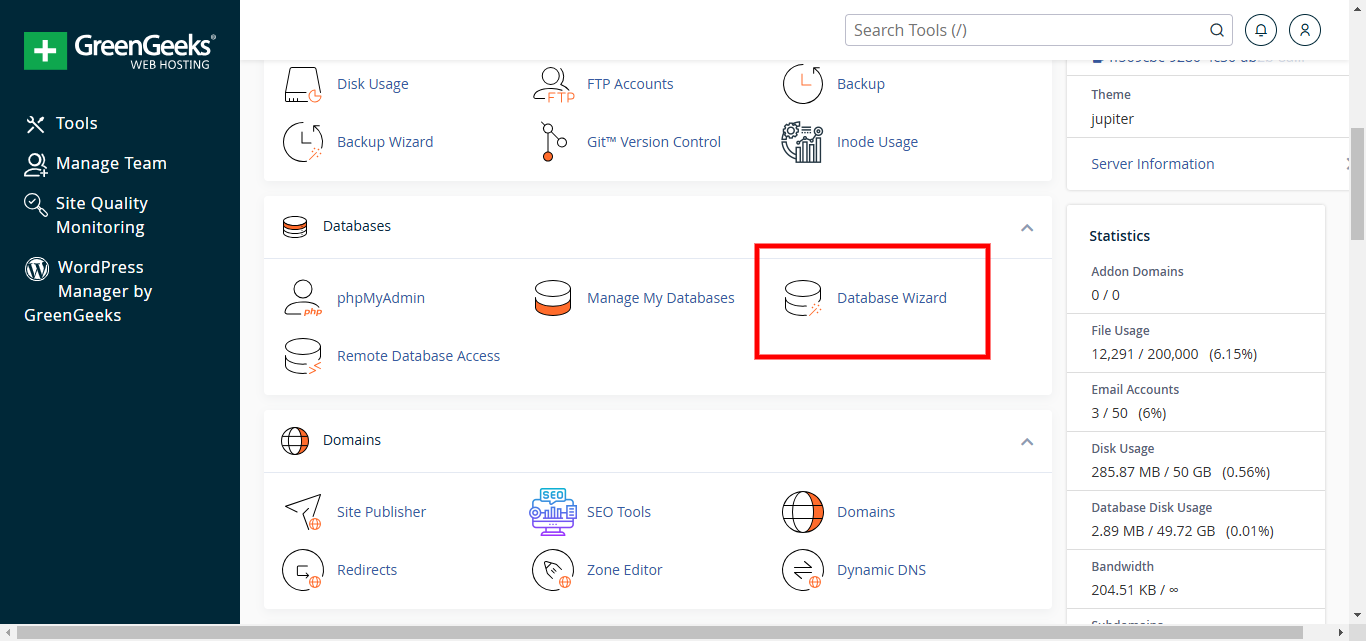
Open Database Wizard from your cPanel dashboard.
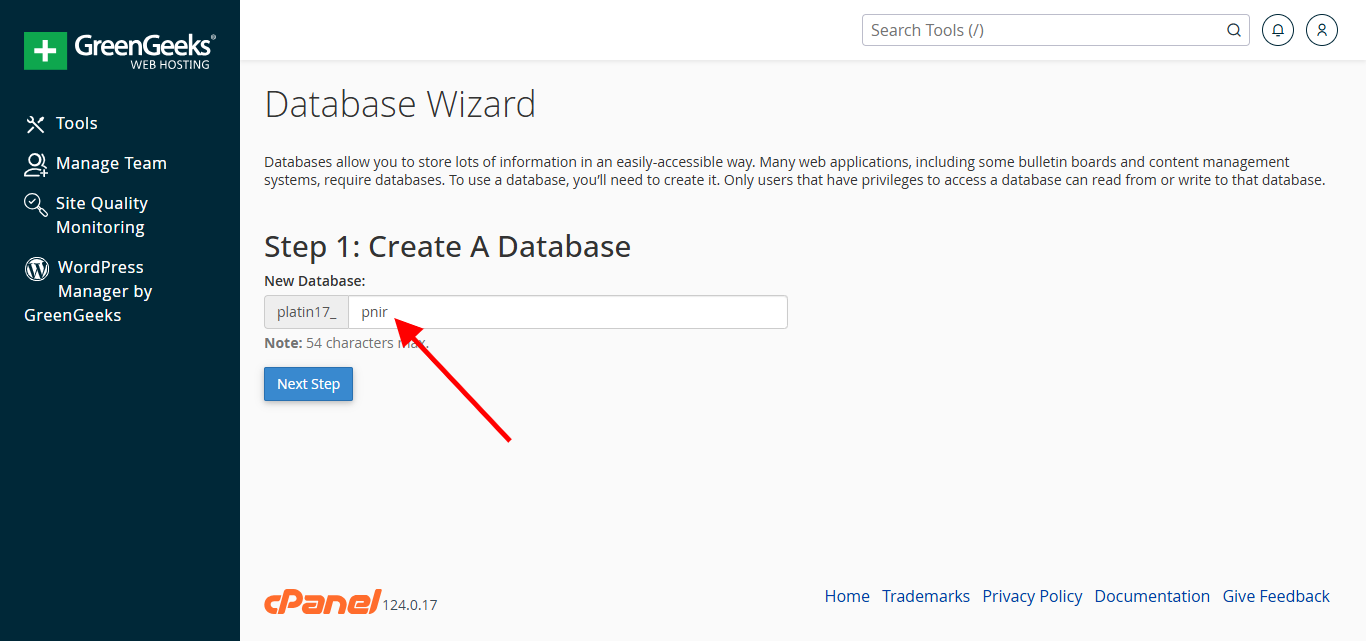
Enter a database name and click Next Step.
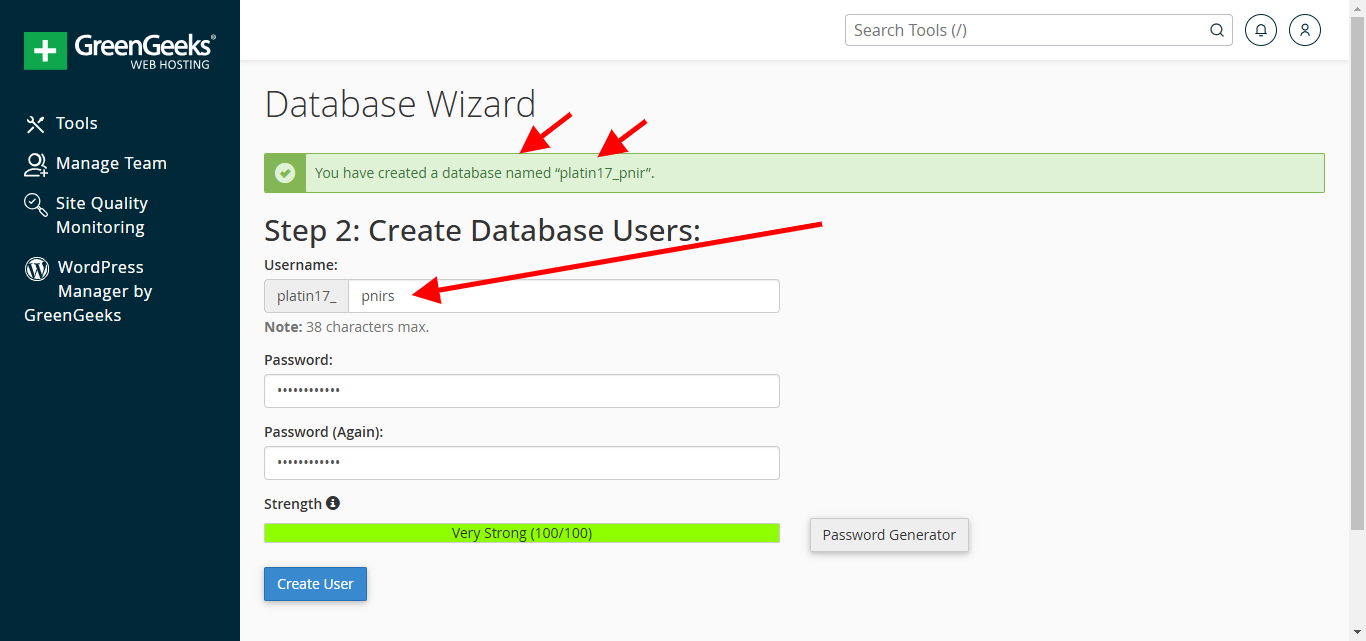
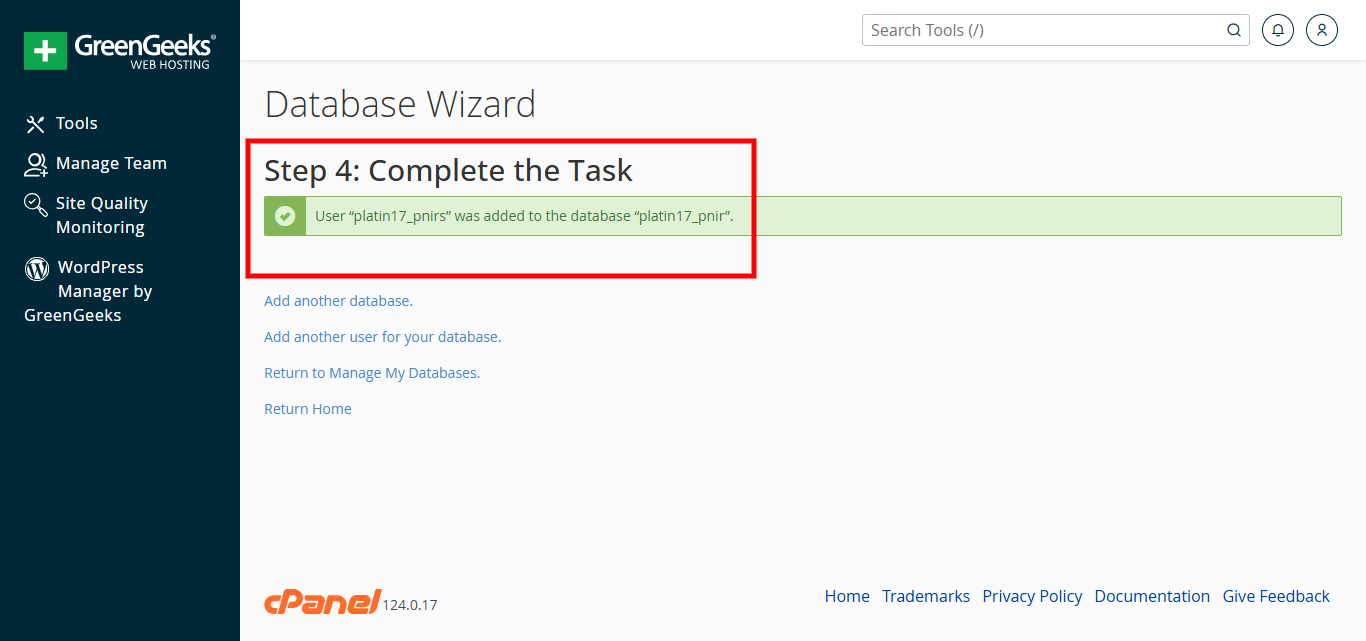
Create a database username and password, then click Create User.
Check ALL PRIVILEGES and click Next Step.
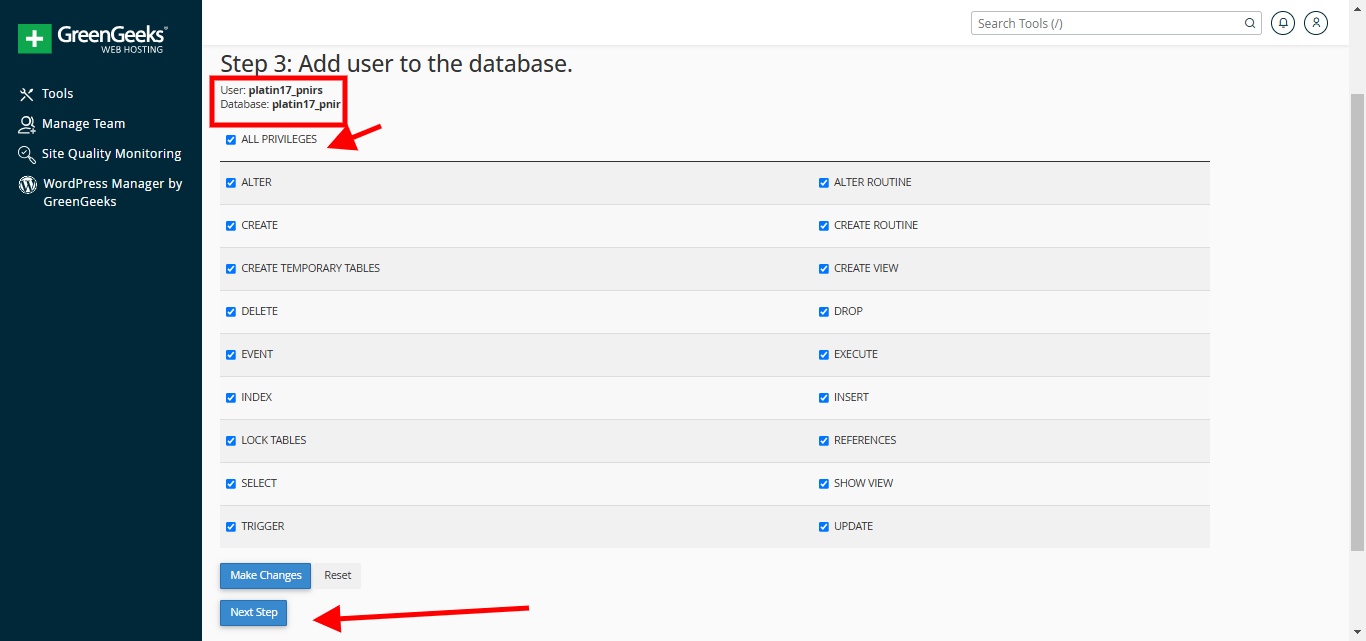
Database configured successfully! Keep your credentials handy for the next step.
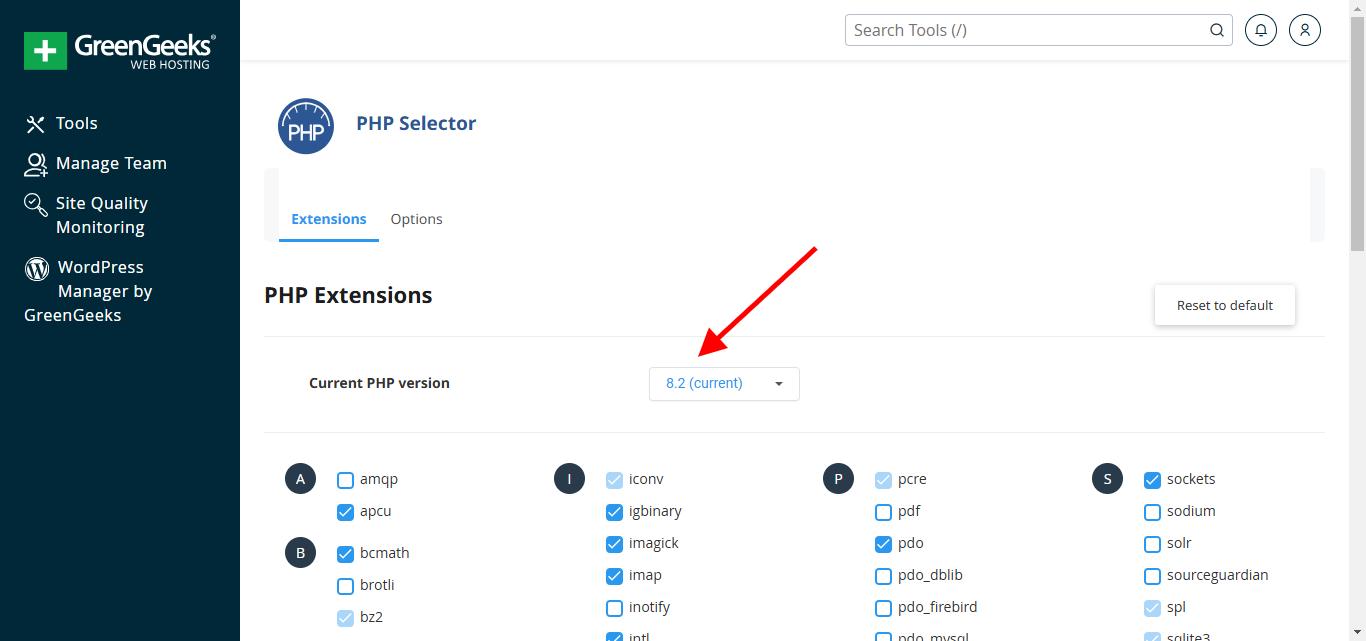
Set PHP version to 8.2 in your cPanel PHP selector.
Step 3 — Run the Installer
Visit your domain URL — the installer will launch automatically.

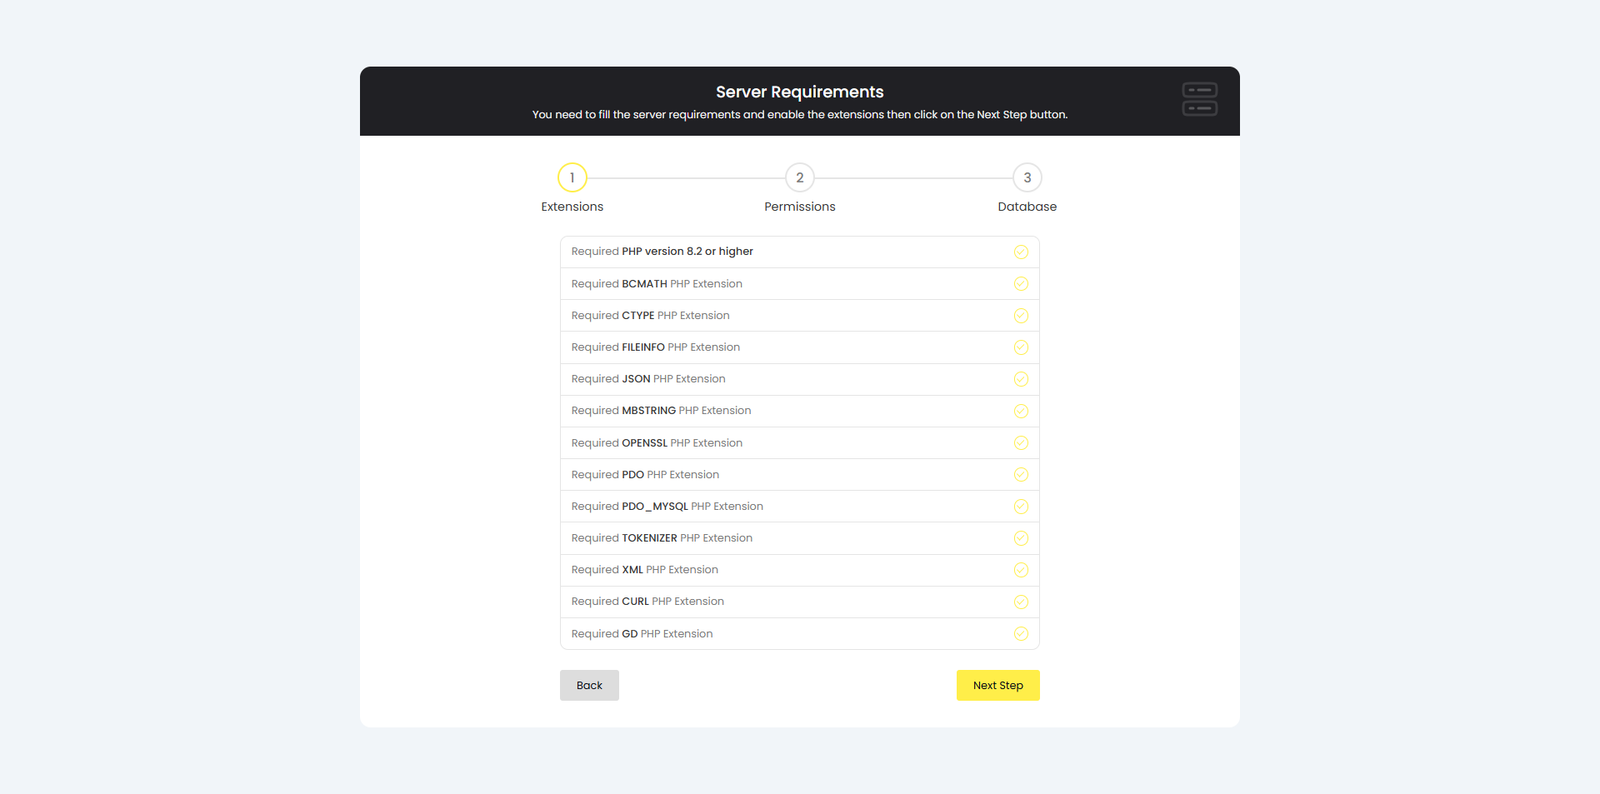
Verify server requirements and enable all required PHP extensions. Click Next Step.
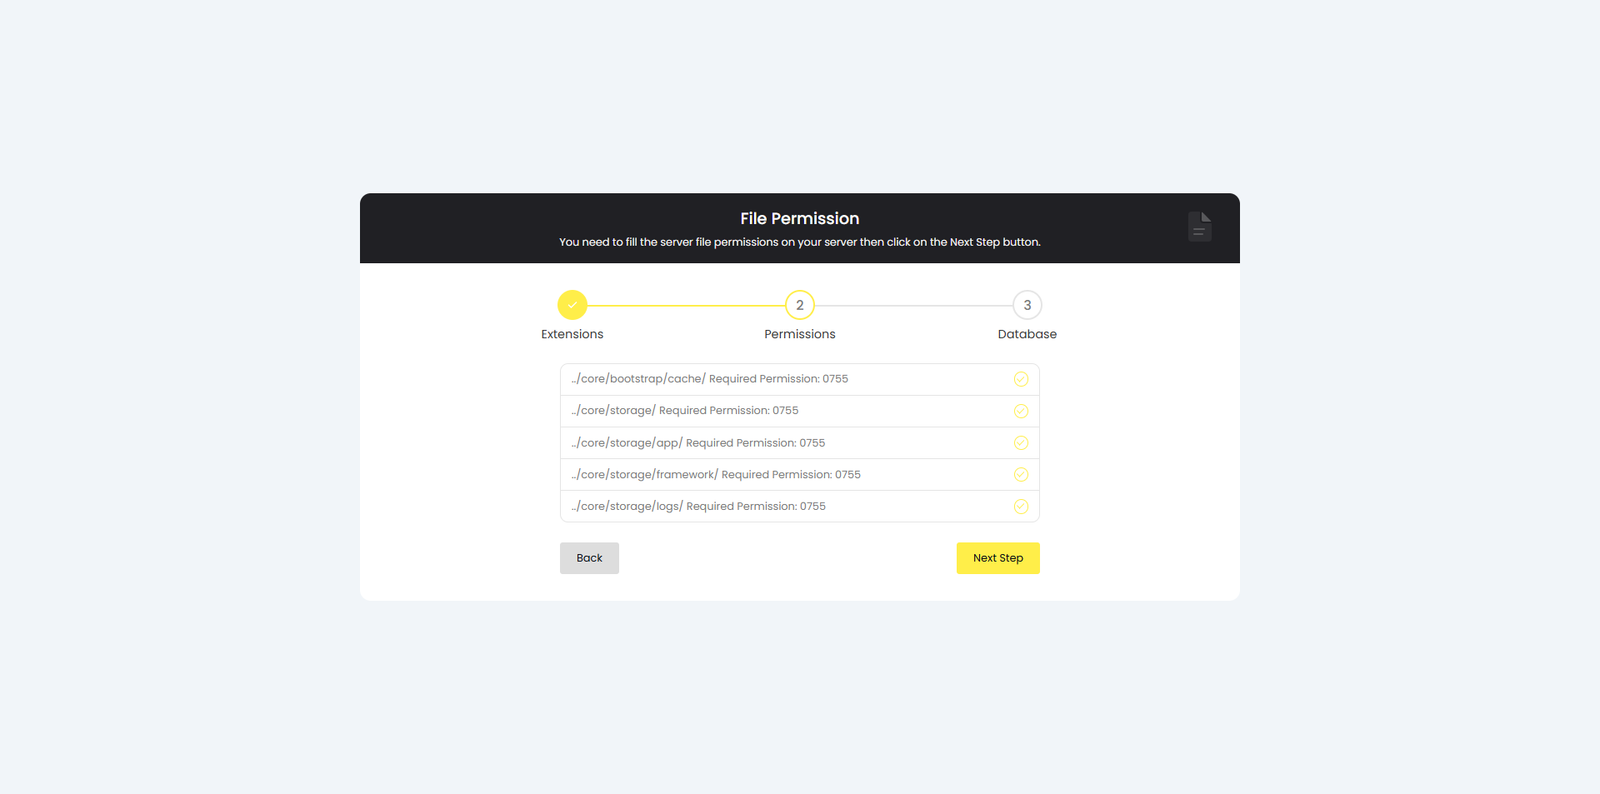
Verify file permissions on your server. Click Next Step.
Enter your database credentials and click Install Now.
You will need to fill in the database information and click on the Install Now button.
localhost as the hostname.
Installation complete! Your HyipNir platform is ready.

Installation Video Guides

Admin Login Access
Access the admin dashboard at: https://yoursite.com/admin/login
Enter your admin email and password to log in.
Admin Dashboard
Cron Jobs
How to Set Up Cron Jobs
Log in to your admin dashboard and copy the Cron URL. Then log in to your cPanel server, search for Cron Jobs, paste the URL, set your preferred time interval, and save.


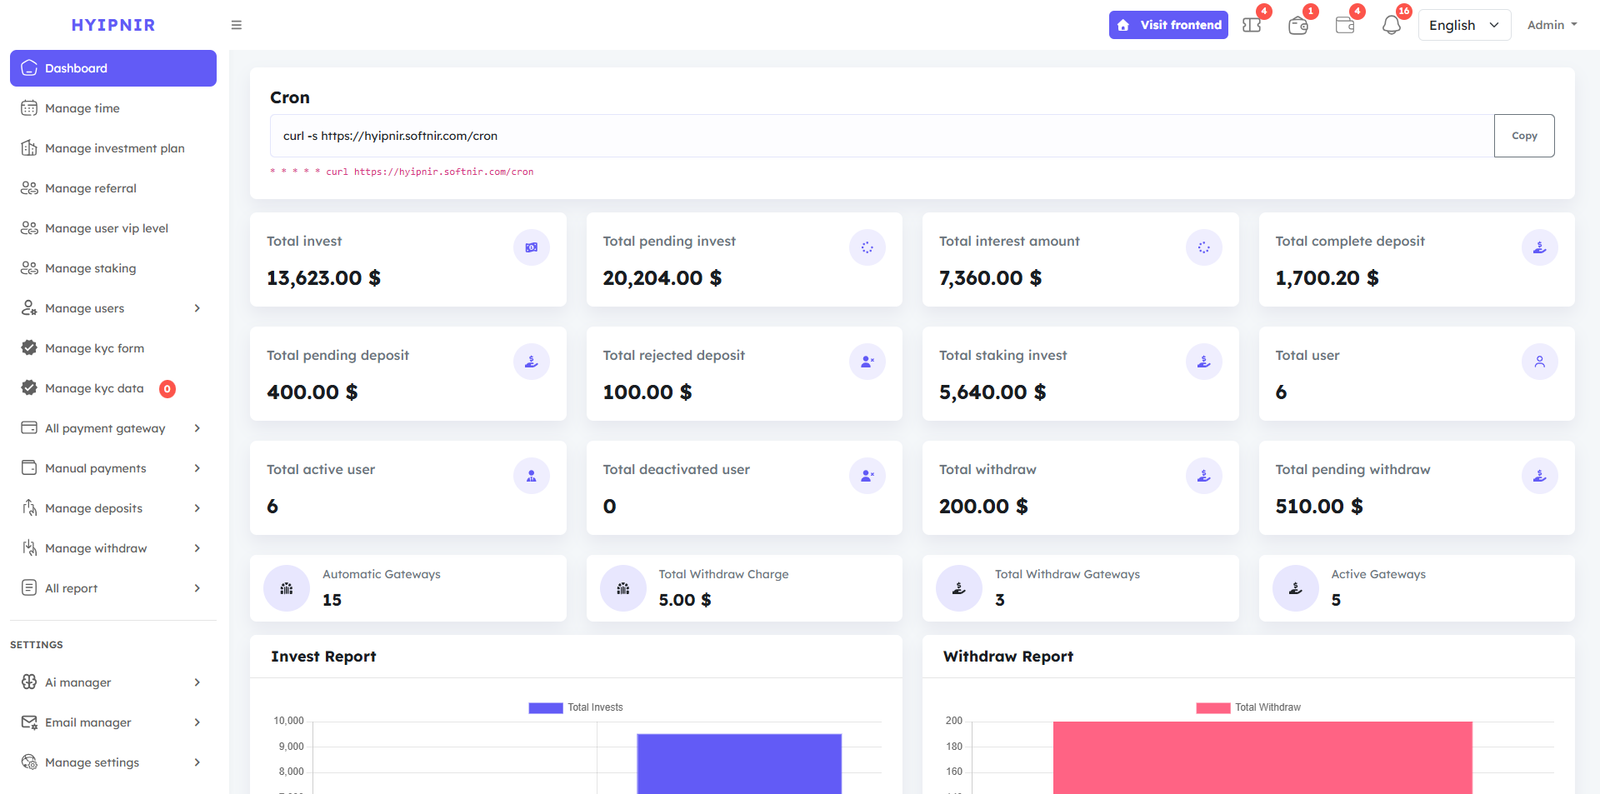
Dashboard
The Admin Dashboard gives you a complete overview of your platform at a glance: Total Investments, Pending Investments, Total Interest, Total complete deposit, Total pending deposit,Total rejected deposit, Total staking invest, User Statistics, Withdrawal data, Gateway status, and visual Investment & Withdrawal reports.
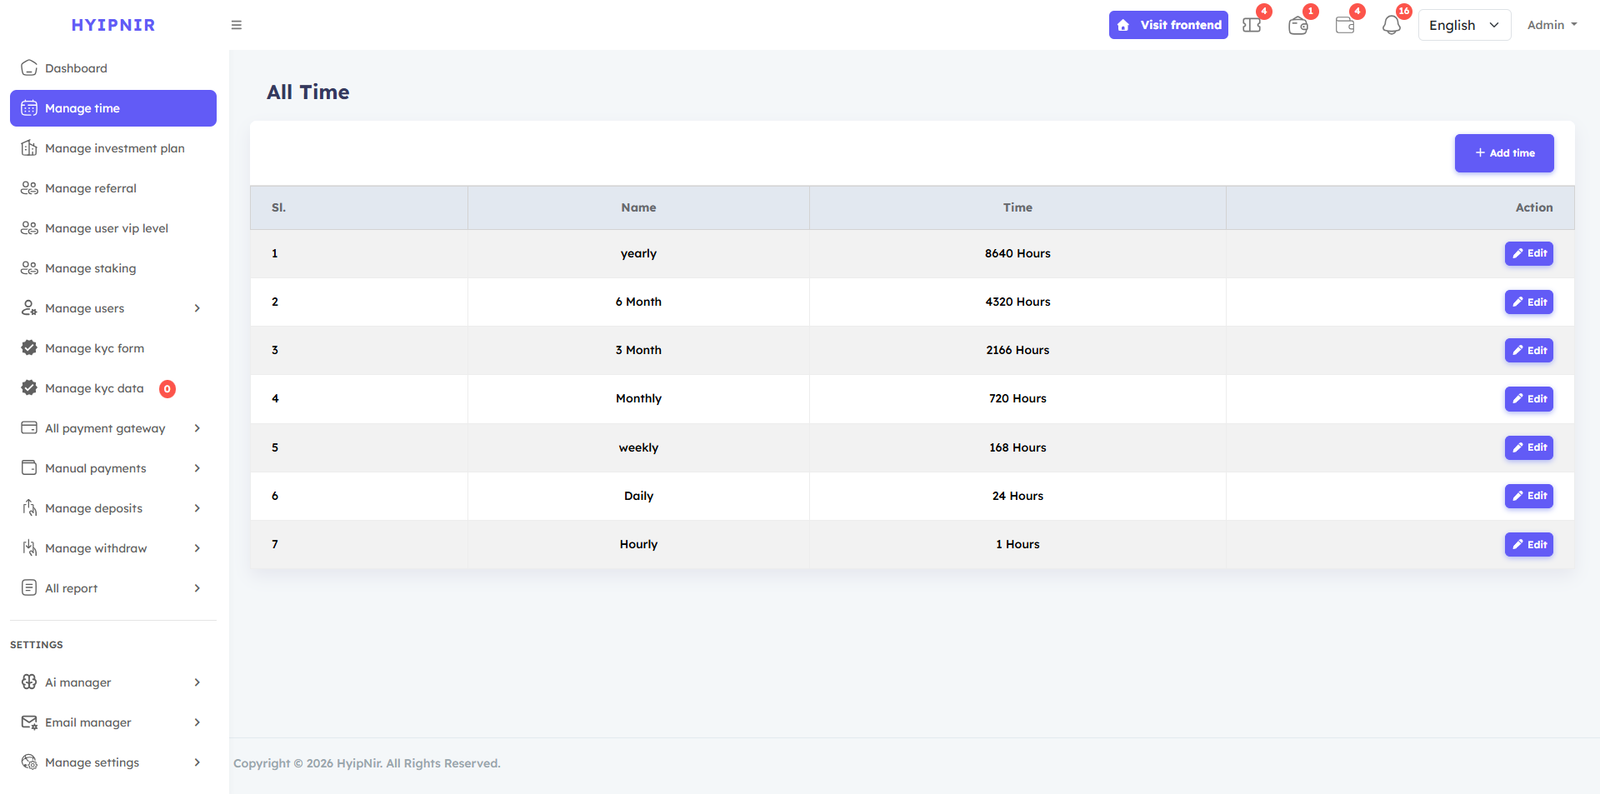
Manage Time
Set profit return intervals here. All times are calculated in hours. For example, set Time name: One Day with Hours: 24. For yearly returns, use Hours: 8640. You can create and edit unlimited time periods as needed.
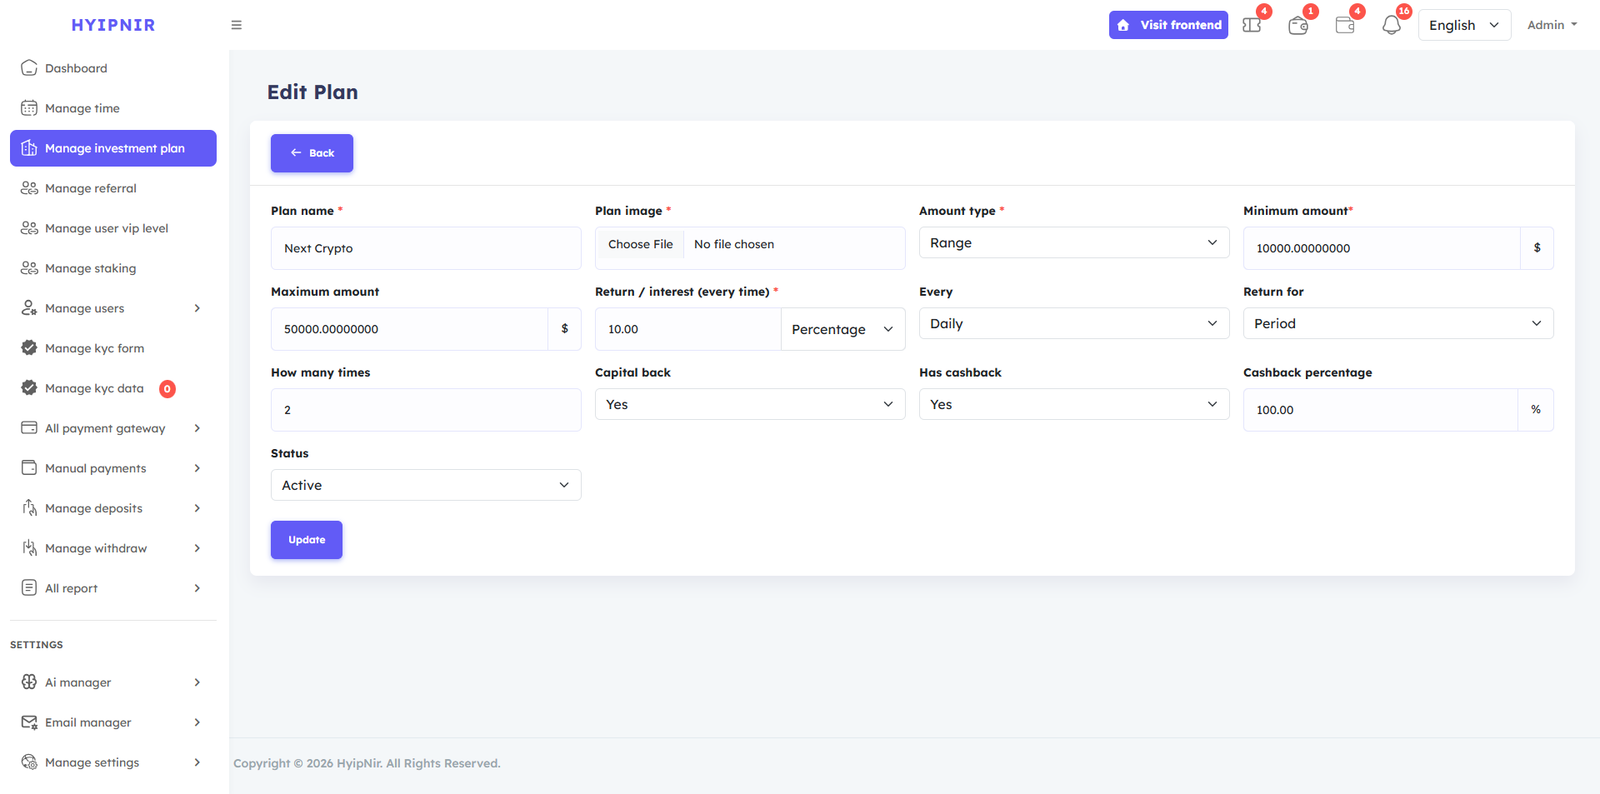
Manage Investment Plans
Create unlimited investment plans with full customization. Each plan supports the following options:
- Plan Name — Set your desired plan name.
- Plan Image — Upload a custom image for each plan.
- Amount Type — Choose Range ( $100–$1000) or Fixed ( $50,000).
- Return / Interest — Set as Percentage or Fixed amount per period.
- Every — Select the time interval for profit delivery.
- Return For — Set as Period (limited times) or Lifetime (ongoing).
- Capital Back — Choose whether the original investment is returned.
- Cashback —Optionally enable and set a cashback percentage investment amount. The customer will receive a cashback bonus as soon as they invest. you can seleted yes or no . you can seleted yes Cashback percentage option show you cantype cash back Cashback percentage
- Status — Enable or disable the plan anytime.

Manage Referral
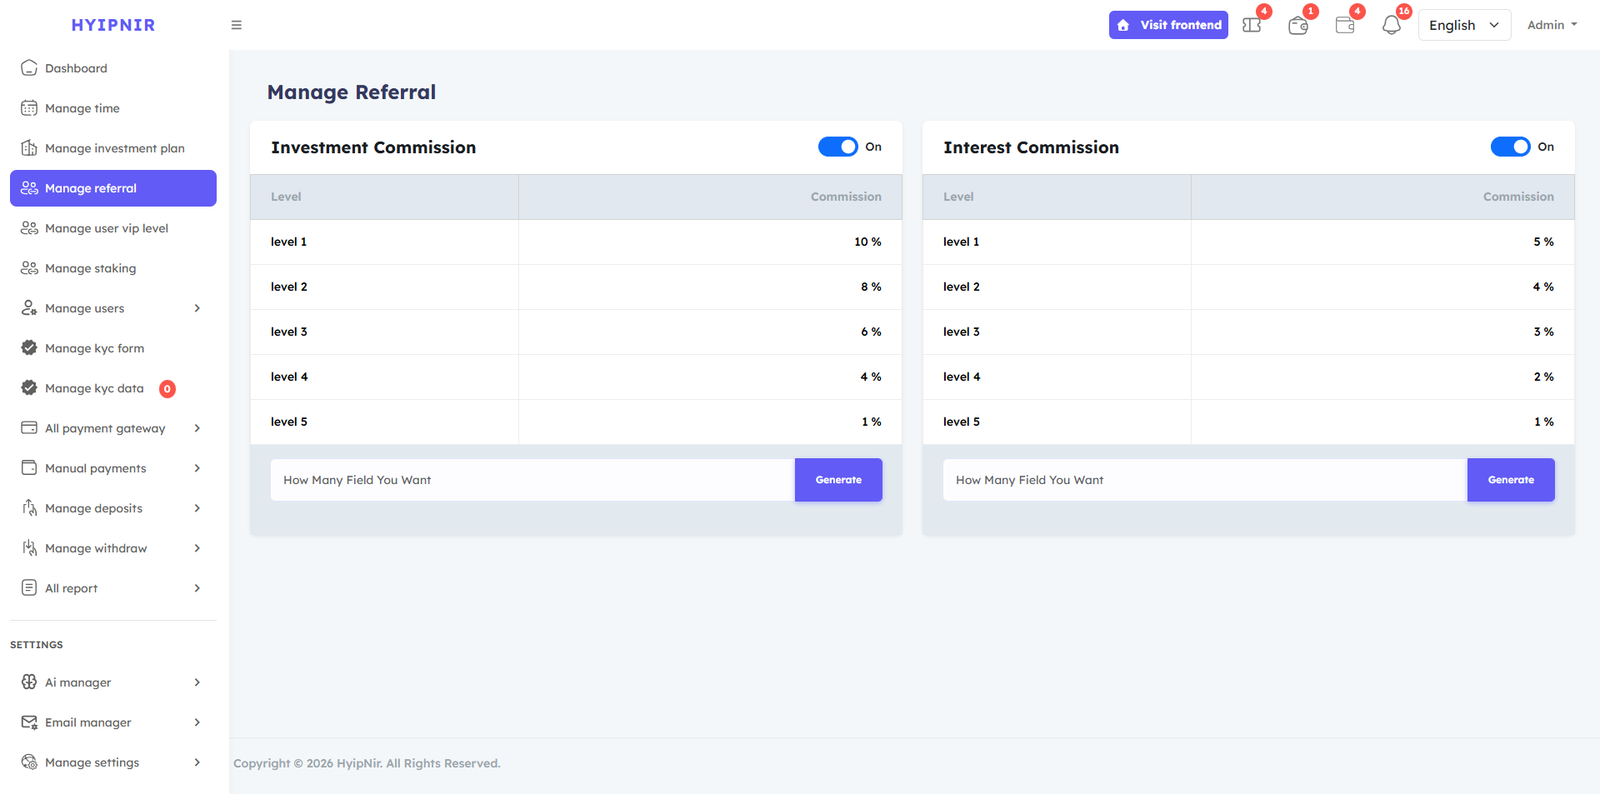
Configure your multi-level affiliate referral system here. You can set up to 5 referral levels. Simply enter the number of levels, click Generate, then set the Investment Commission and Interest Commission for each level. Toggle the referral system on or off with a single click.
Manage User VIP Levels
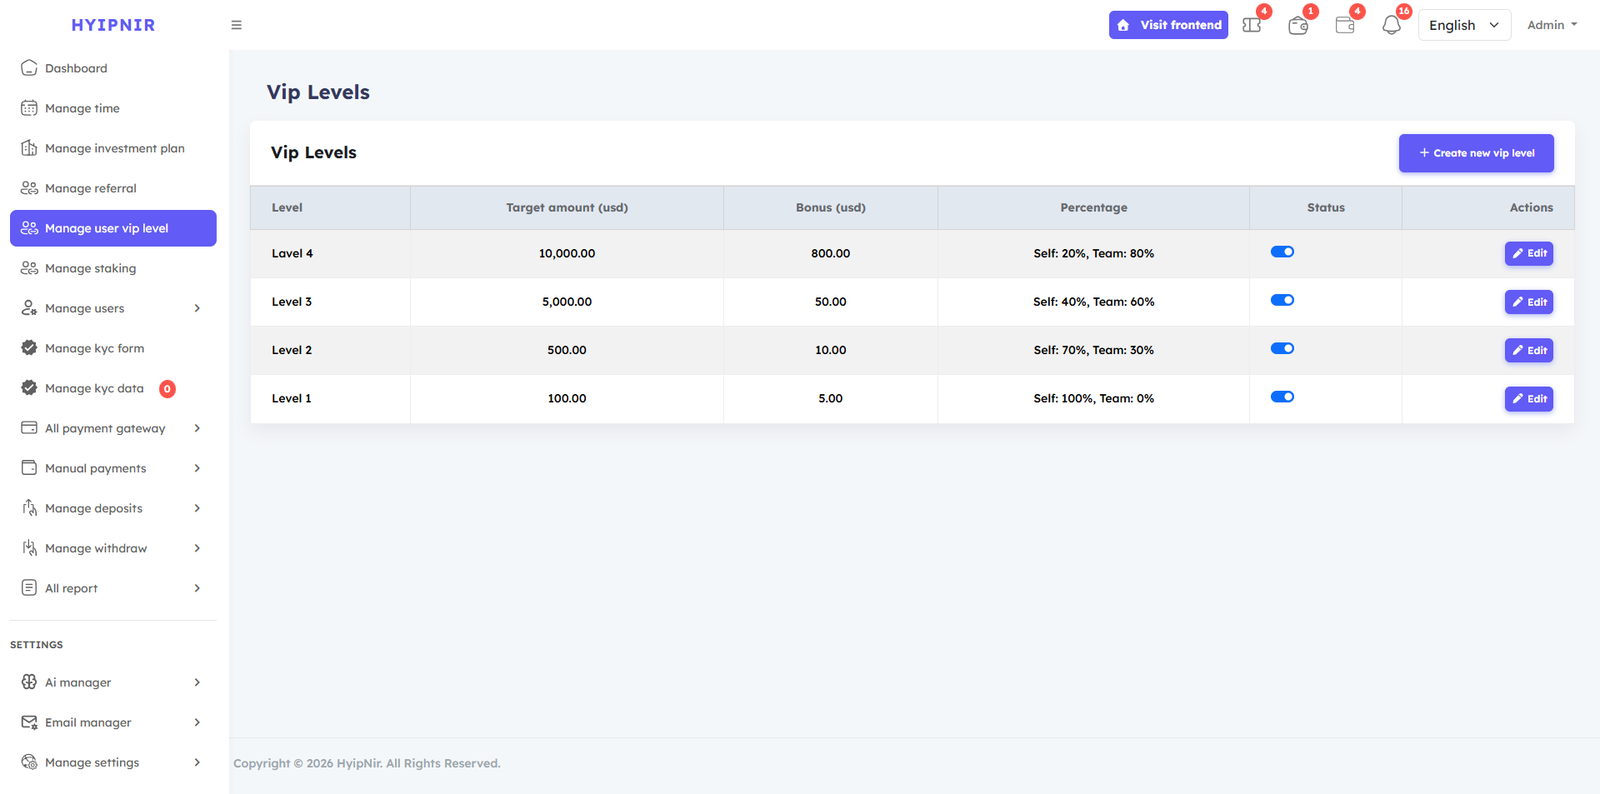
Create unlimited VIP levels to reward and retain your top investors. As users meet each VIP level's conditions, badges and bonuses are automatically unlocked in their dashboard — driving more investment and referrals.
To create a VIP level, click Create New VIP Level and fill in: Level Name, Target Amount, Bonus Amount, Self Percentage, Team Percentage, Minimum Earning, Minimum Referrals, and a Badge Icon Image.
Manage Staking
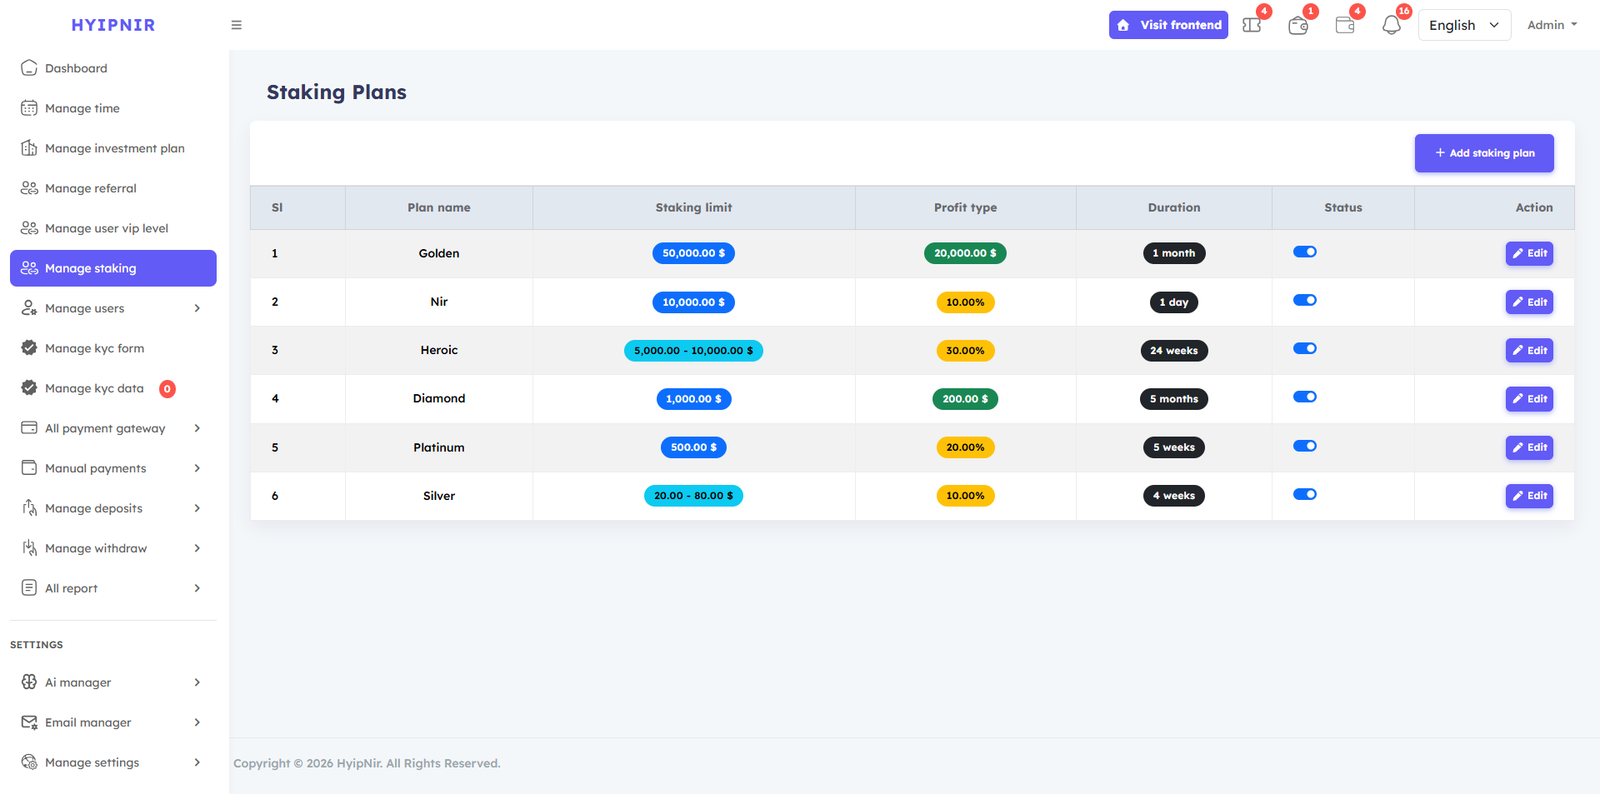
Create unlimited staking plans where users lock their balance for a set duration and receive their capital plus profit at maturity. Capital and profit are paid out only once at the end of the staking period.
Example: A user stakes $1,000 at 10% profit for 1 month. After 1 month, they receive $1,000 (capital) + $100 (profit).
Each staking plan supports Fixed or Range amounts, Percentage or Fixed profit, and durations in Days, Weeks, or Months.
To create a Staking plan ,the admin will first click on the Add Staking Plan button and then set the name of the stacking plan. And the amount types can be fixed or range. If the admin selects fixed, then he will type the fixed amount, and if the admin selects range, then he will definitely type the amount according to the range. Then the admin will determine the profit of the stocking plan. The admin will see two options there: one is the percentage, the other is the fixed admin. If the admin selects a percentage, then he will type the percentage of profit. If the admin selects fix, then he will type the fixed amount there.
By clicking on the edit button, the admin can edit and update the Staking plans, and if the admin wants their Staking plan not to be displayed on the website, they can turn off the status button, and if left on, it will be displayed on the website.
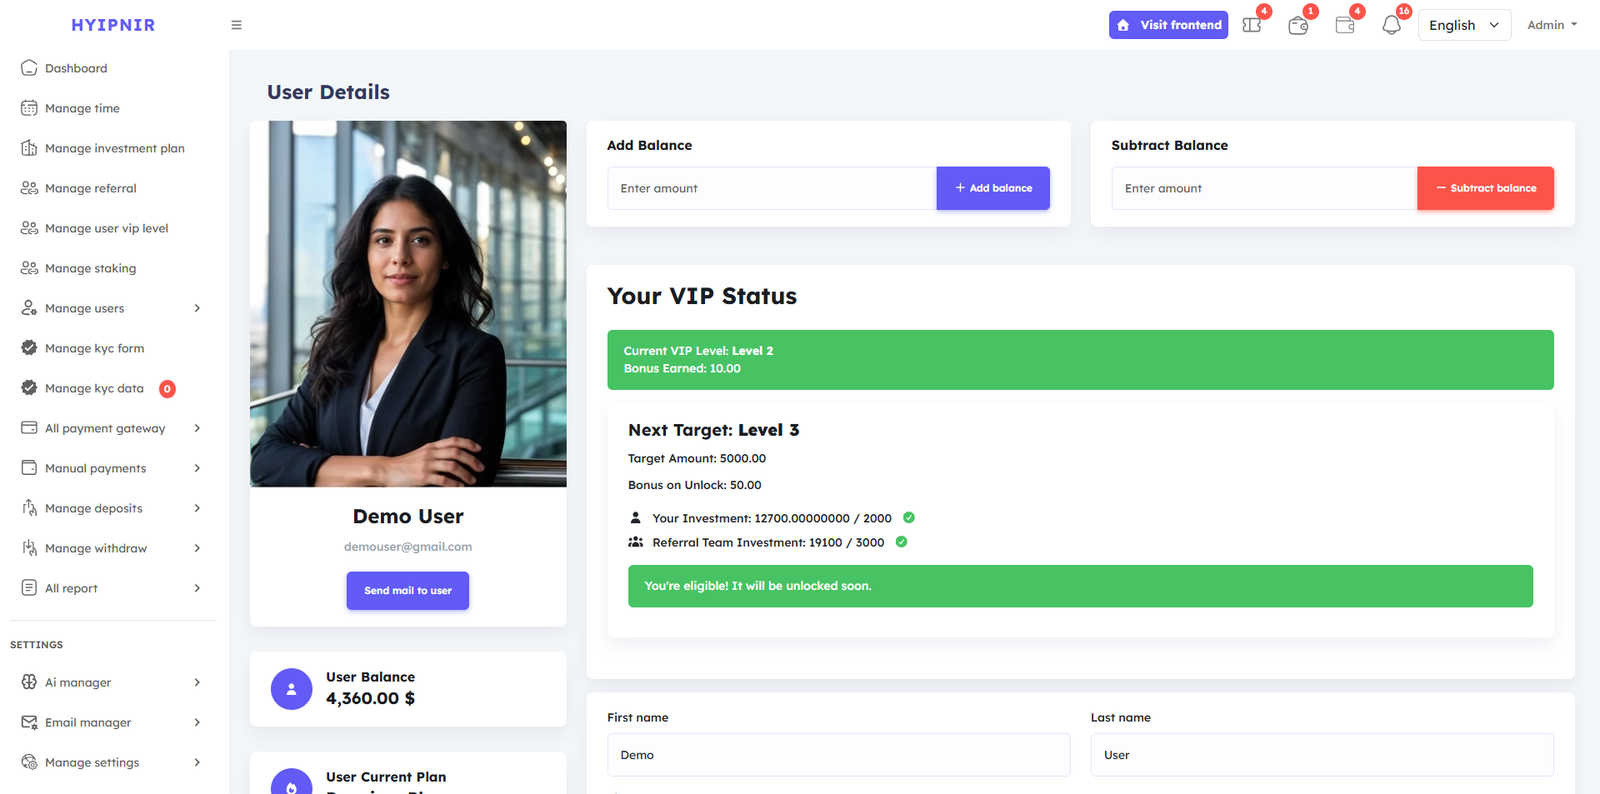
Manage Users
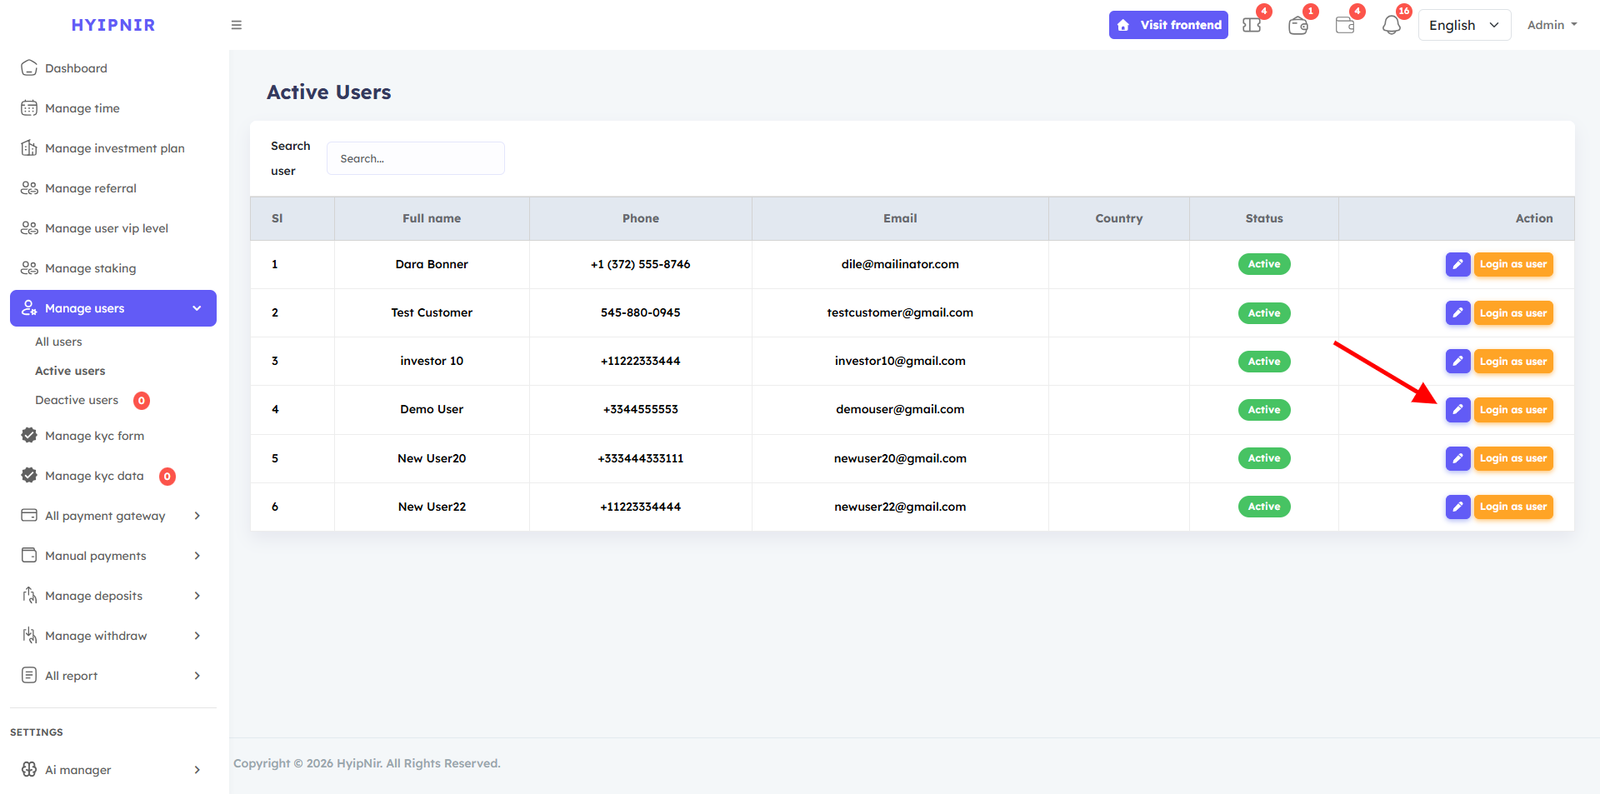
View and manage all users across three categories: All Users, Active Users, and Deactive Users. From each user's detail page, you can add or subtract balance, edit personal information, and activate or deactivate accounts. Use the Login as User button to access any user's dashboard directly.
admin can see User details and Add balance, Subtract balance
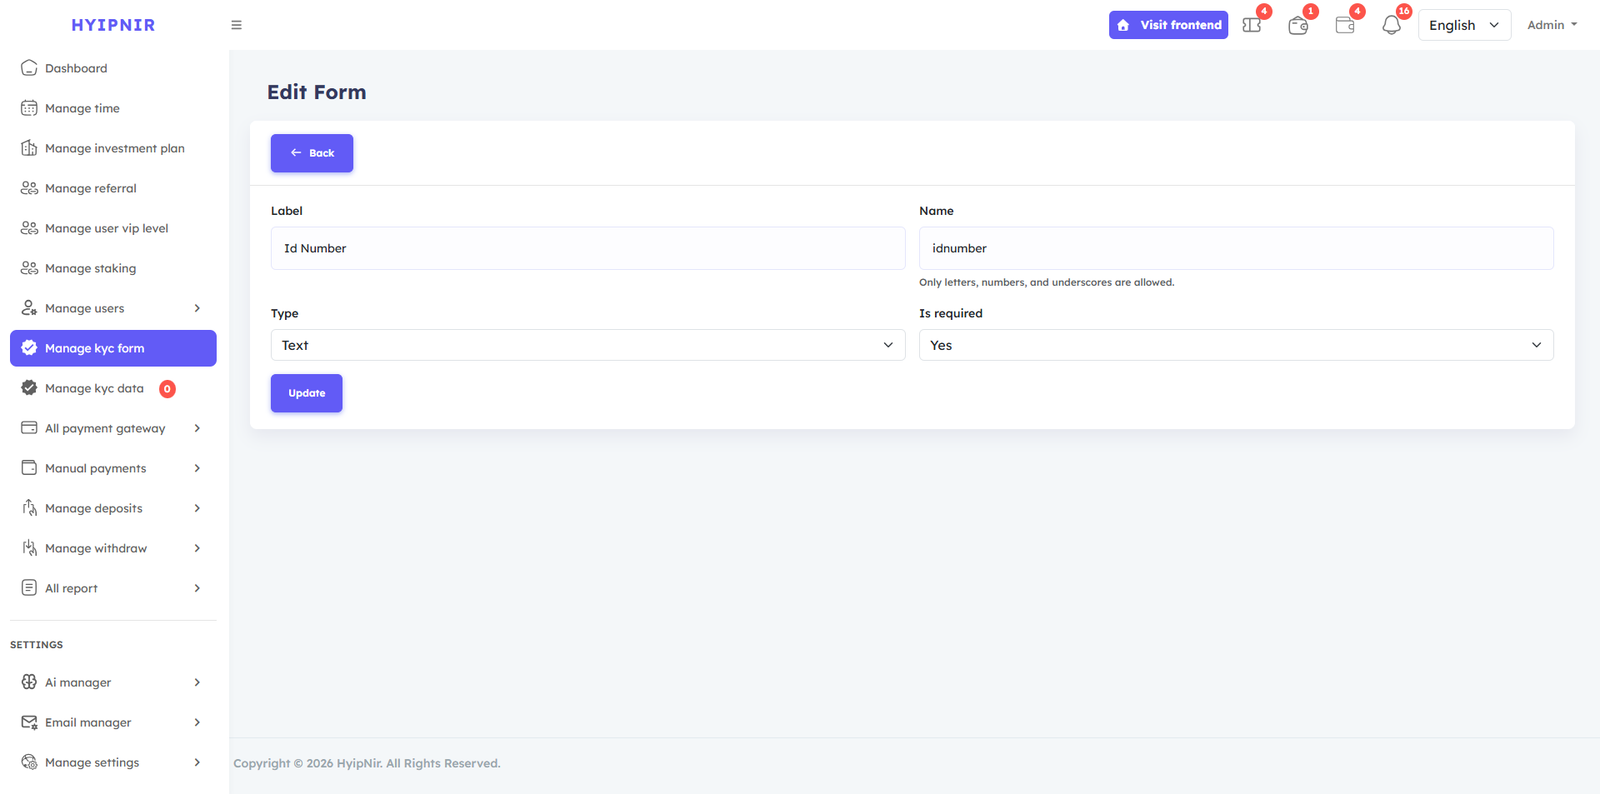
Manage KYC Form
Verify user identities through the KYC (Know Your Customer) system. Create custom verification forms for documents such as passports, driving licenses, and ID cards. Review submitted documents and accept or reject them from the admin panel.
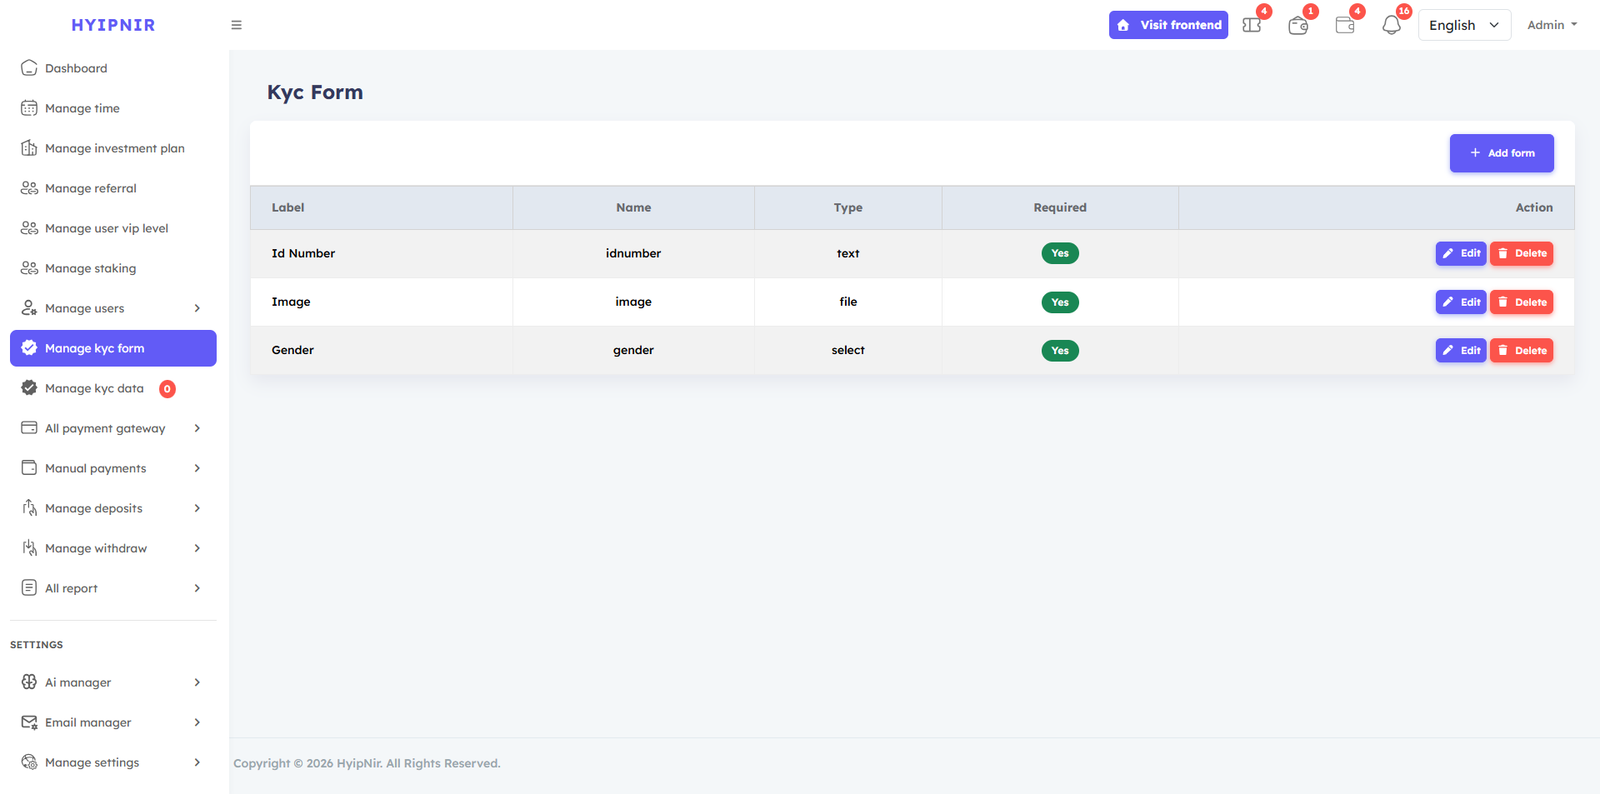
Clicking on the add from option will show the create form option. From where KYC submission forms can be created for admin users such as passport, driving license, ID card.
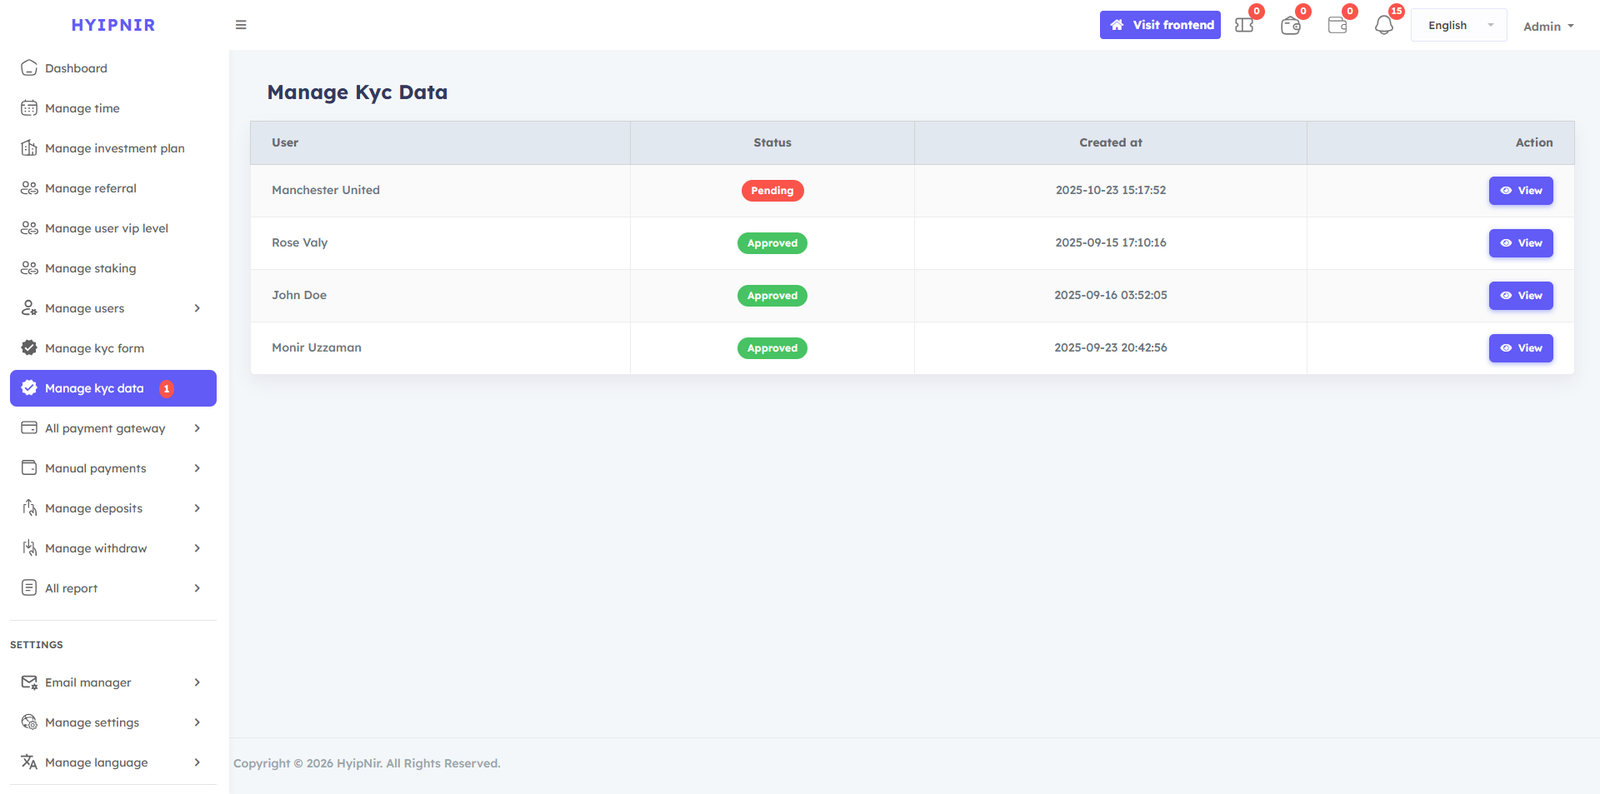
When users submit KYC information, such as driving license and passport information, to the admin, the Manage KYC Data admin will view the forms and be able to accept if correct and reject if incorrect..
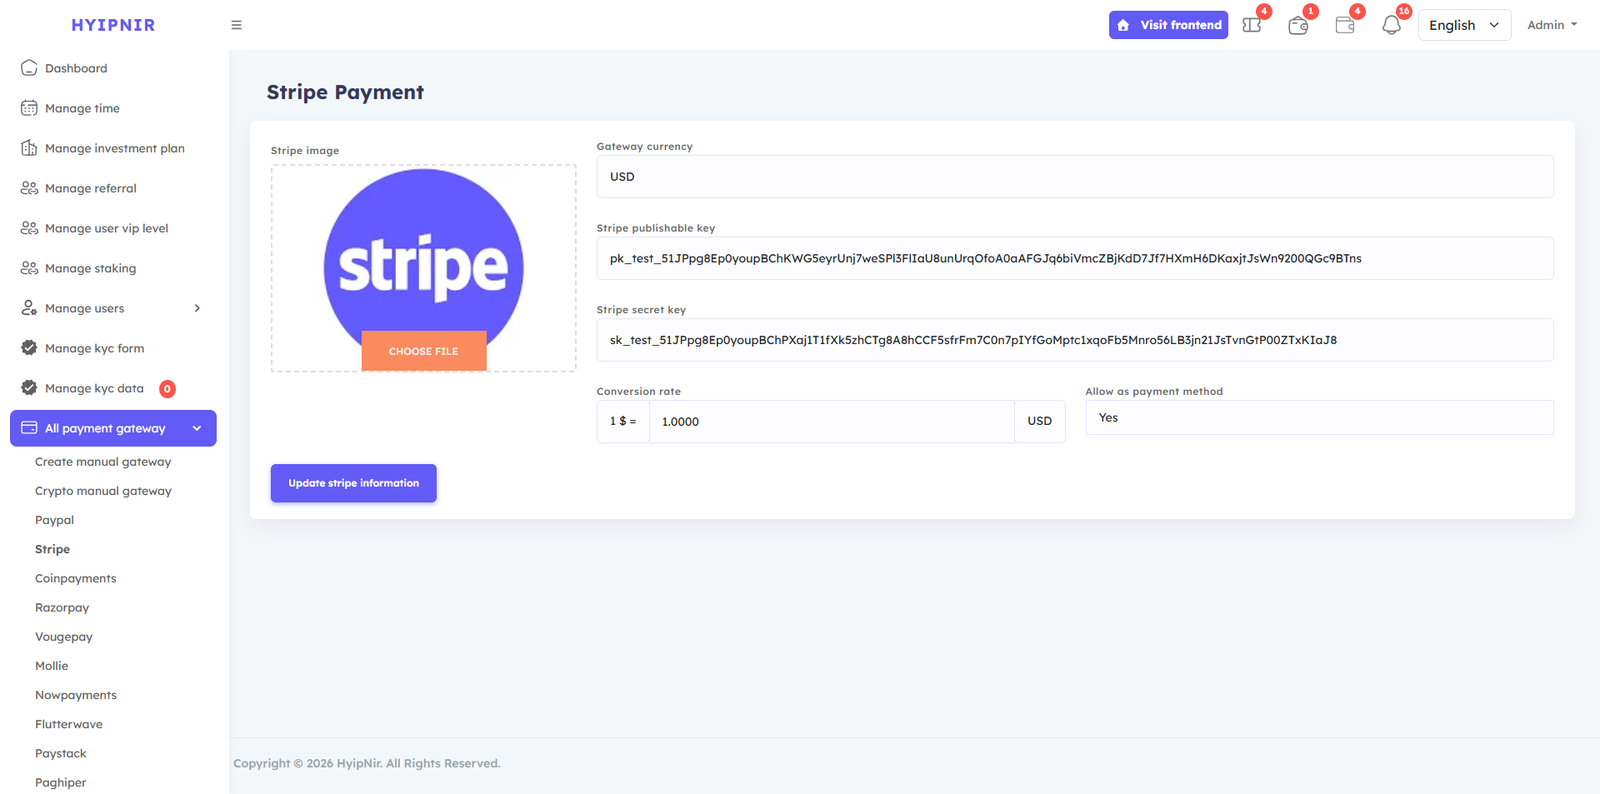
All Payment Gateways
Manage both online and manual payment gateways from one place. Active gateways are shown to users; inactive ones are hidden. Add unlimited manual gateways and configure crypto wallets (USDT, BTC, etc.) with ease.
Supported Gateways: PayPal, Stripe, CoinPayments, VougePay, Moille, NowPayments, Flutterwave, Paystack — all fully dynamic and configurable from your admin dashboard.
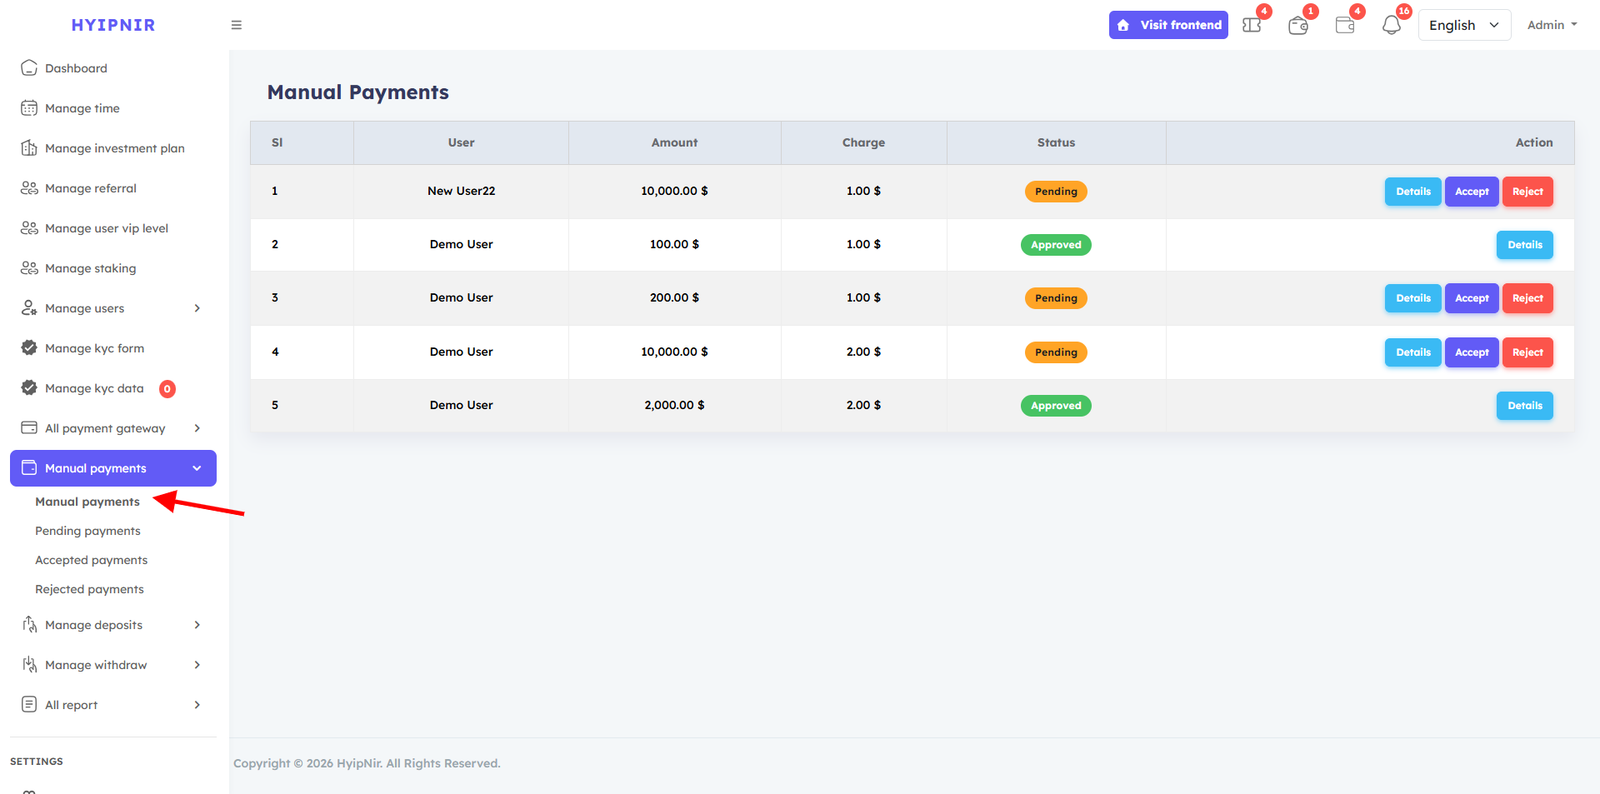
Manual Payments
Review all pending manual payment requests from users. View detailed payment information for each submission and Accept or Reject them individually.
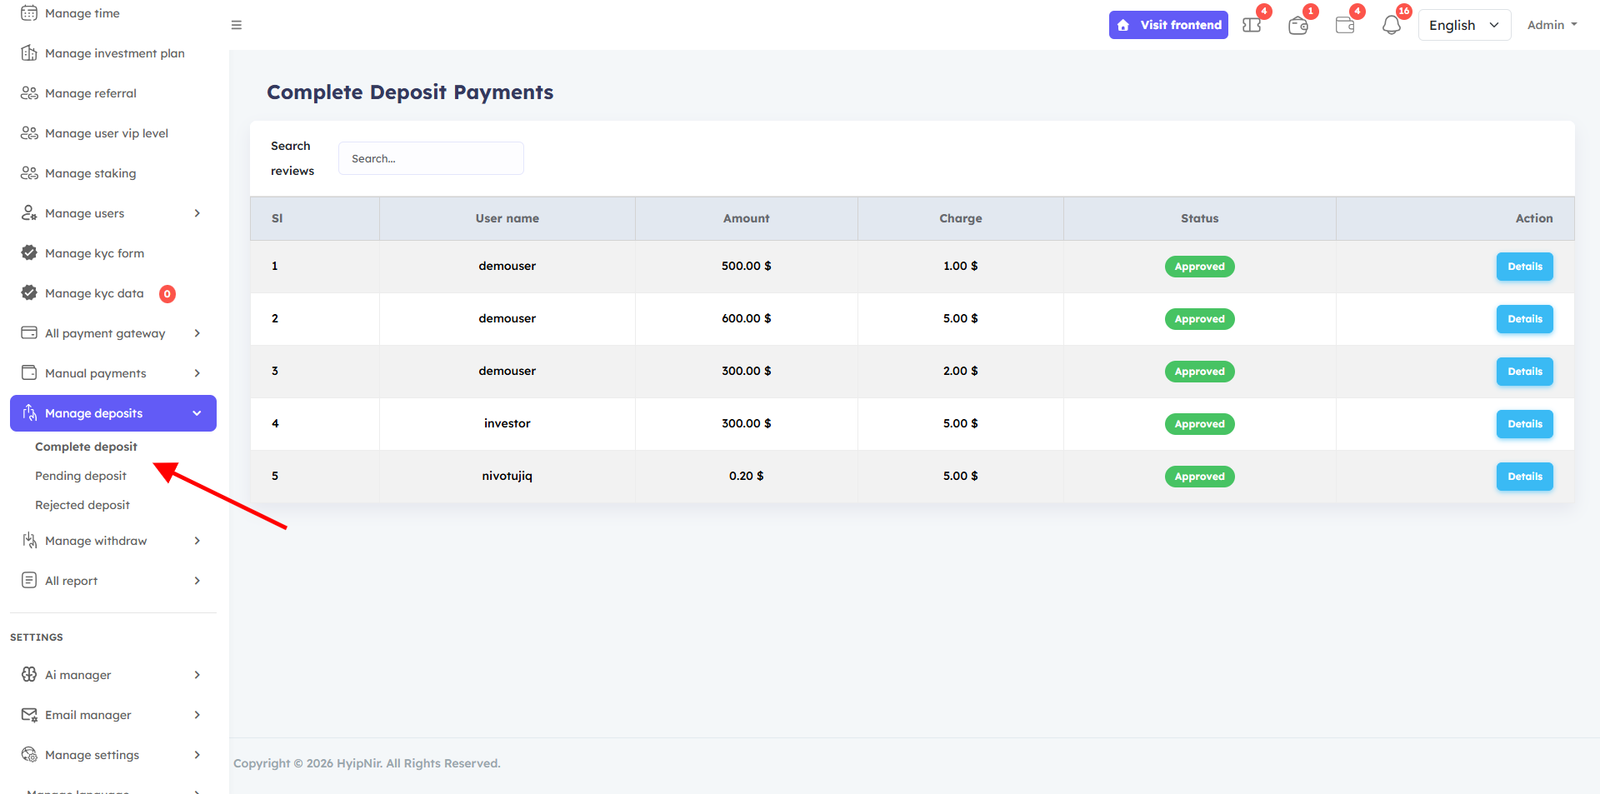
Manage Deposit
Online gateway deposits are processed automatically. Manual deposits appear in the pending list where you can review details and Accept or Reject each submission.
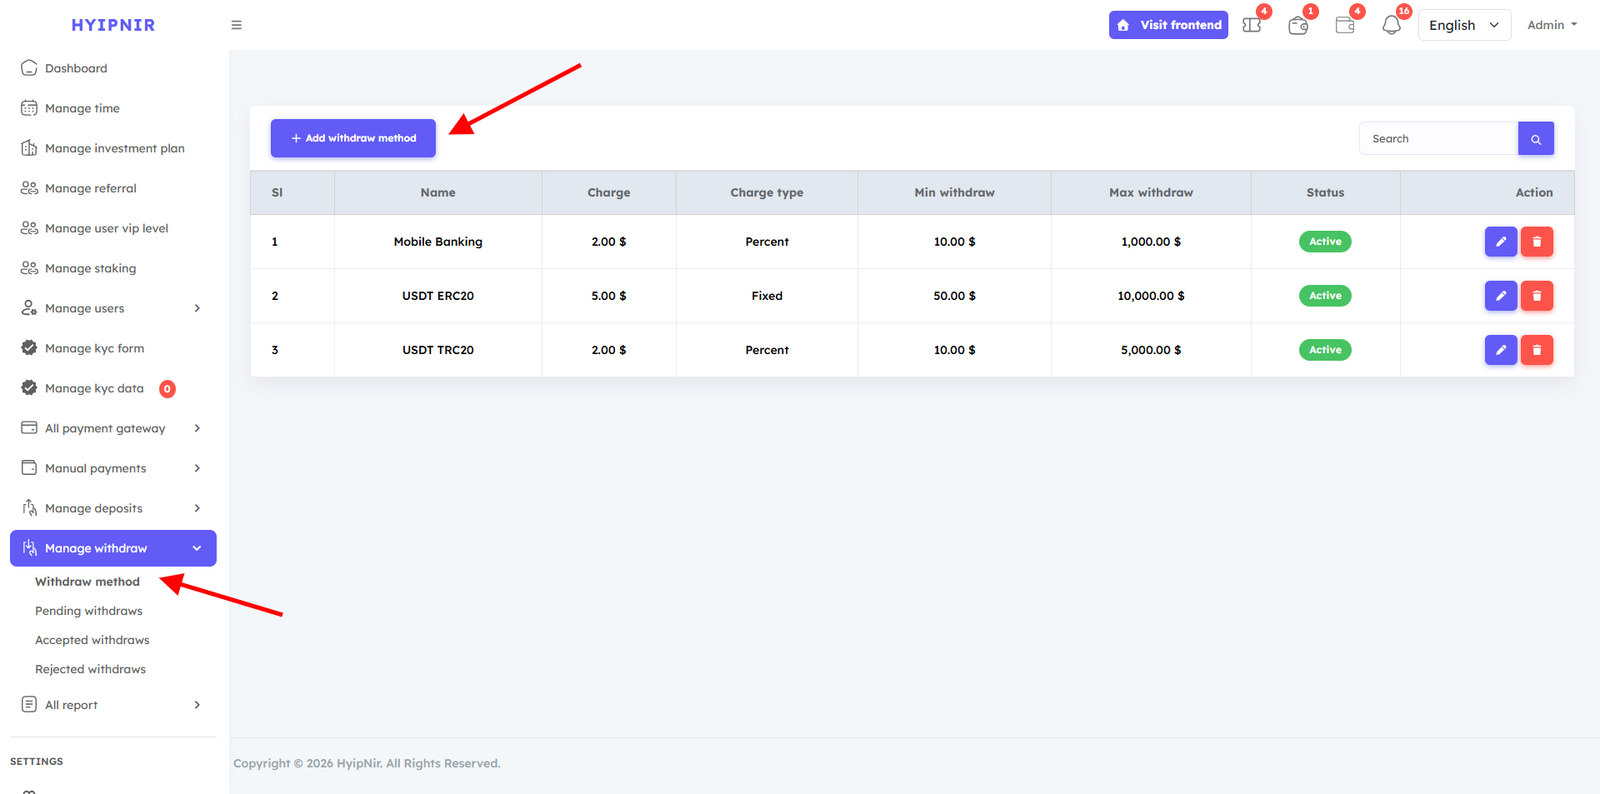
Manage Withdraw
The withdrawal management panel has four sections: Withdraw Methods, Pending Withdrawals, Accepted Withdrawals, and Rejected Withdrawals. Create custom withdrawal methods, review user requests, and approve or reject them — automatically moving them to the correct category.
In the Withdraw method option, you will see a button called Add withdraw method , from there you can create the withdraw method as you wish and you can edit, Update , delete and Inactive the active Withdraw method .
All users' withdraws requests will be recorded and Pending withdraws options will be submitted or listed. Admin will check the account details and then can accept or reject. If admin accept, then it will move from pending option to Accepted withdraws option and if it rejects, then it will move to Rejected withdraws option.
All Reports
The Reports section provides detailed financial records to help you track every activity on the platform.
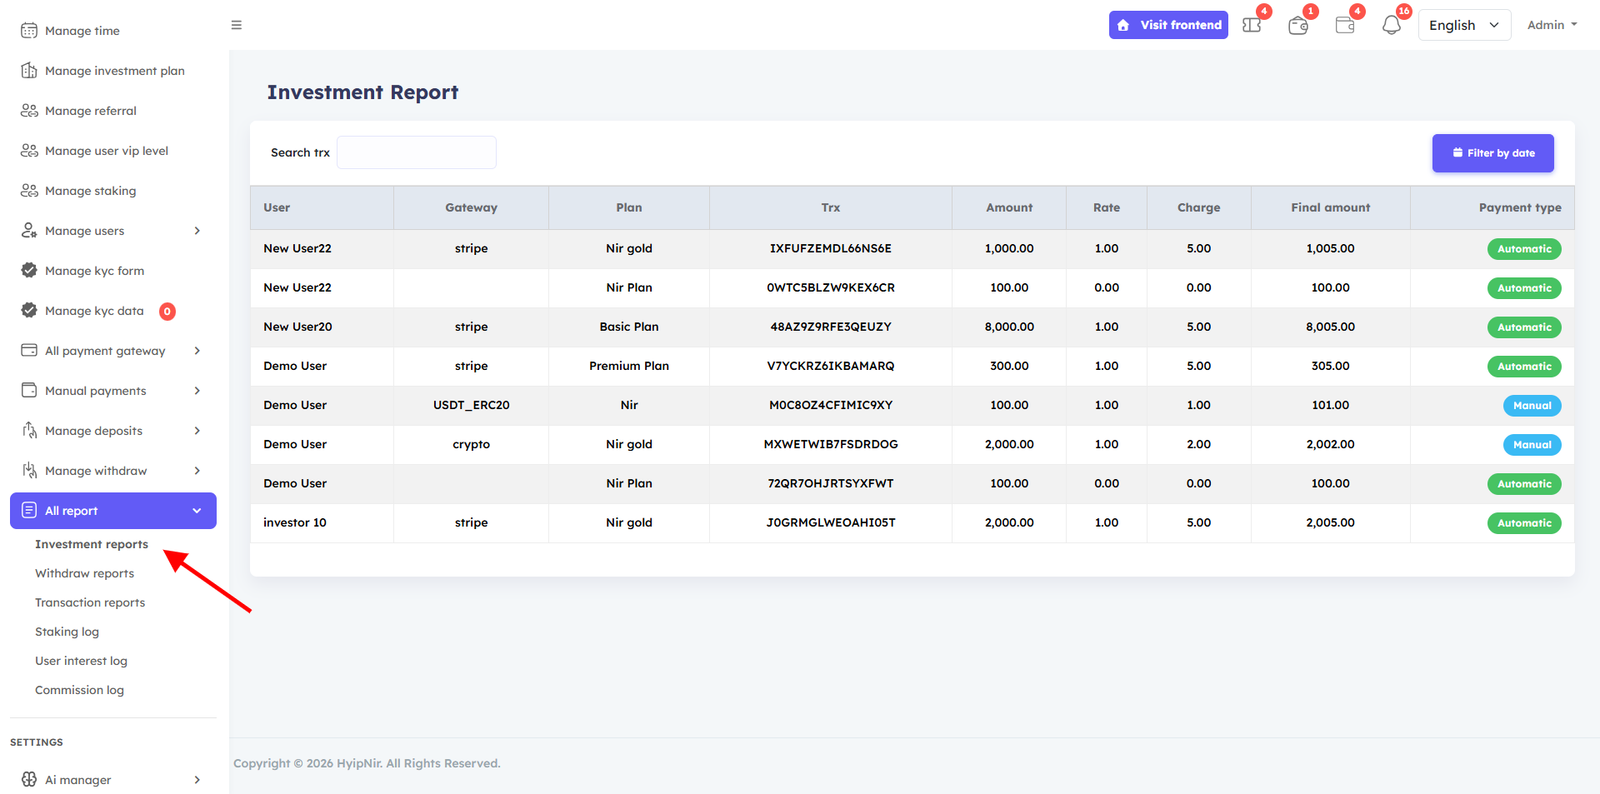
Investment Reports
Track all investment activity with detailed filtering to monitor individual investor performance.
The all report manu in the Admin dashboard provides a detailed record of all Payment reports, Investment report , Withdraw report, Transaction log, All Staking Logs, User interest log, Commission log, Transaction reports made on the website. It helps the admin track successful Payment reports, any issues that need attention. This reports ensures accurate financial reporting, aids in resolving payment-related queries, and enhances transparency in managing customer payments. From the Investment Report option, the admin will be able to view specific investment reports on this website, which will help in tracking investors very easily.
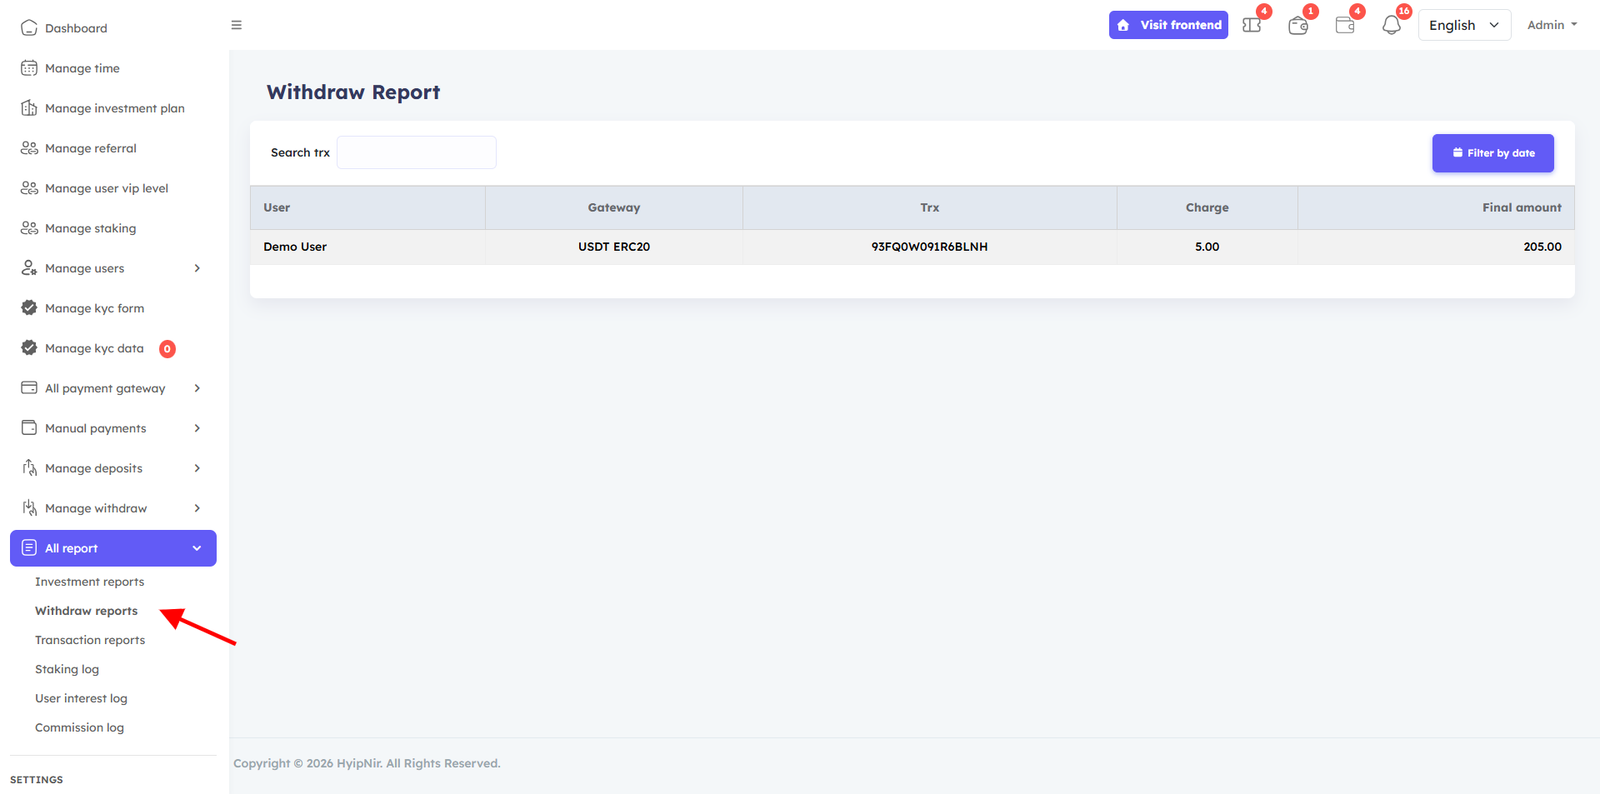
Withdraw Reports
View complete withdrawal history with user details and transaction statuses. From the Withdraw Report option, the admin will be able to view specific Withdraw reports on this website, which will help in tracking investors' Withdrawals very easily.
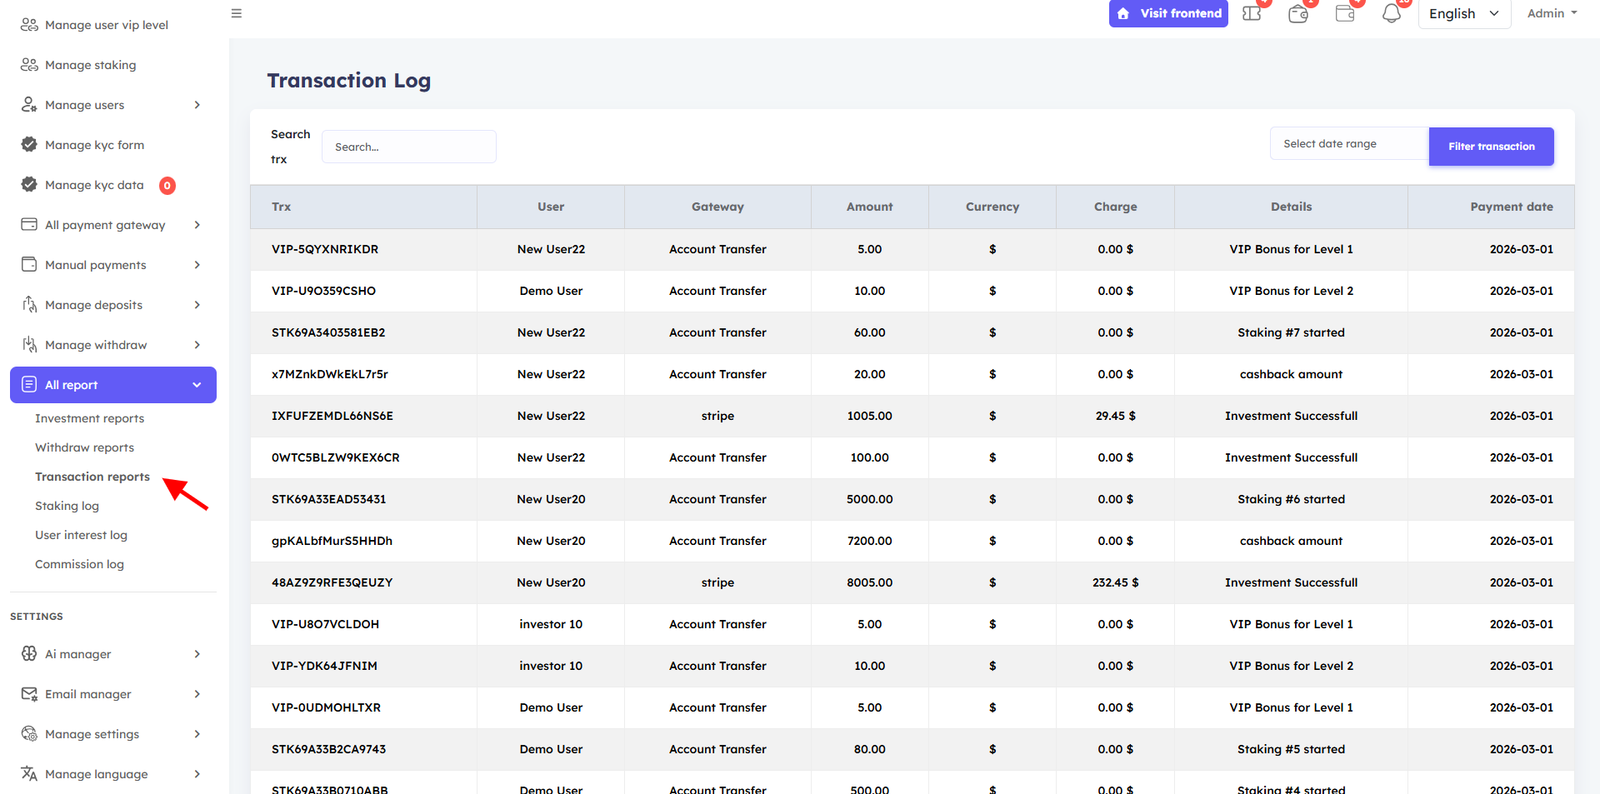
Transaction Logs
Full transaction history for every financial activity across the platform. From the Transaction log option, the admin will be able to view specific Transaction log on this website, which will help in tracking investors Transaction log very easily.
Staking Logs
Complete records of all staking investments and maturity payouts, searchable by user. In the User Staking Logs option, you can see all records of when a user has received Staking investment and investment Staking plan, or you can search for a specific user to see their Staking investment - investment received records.

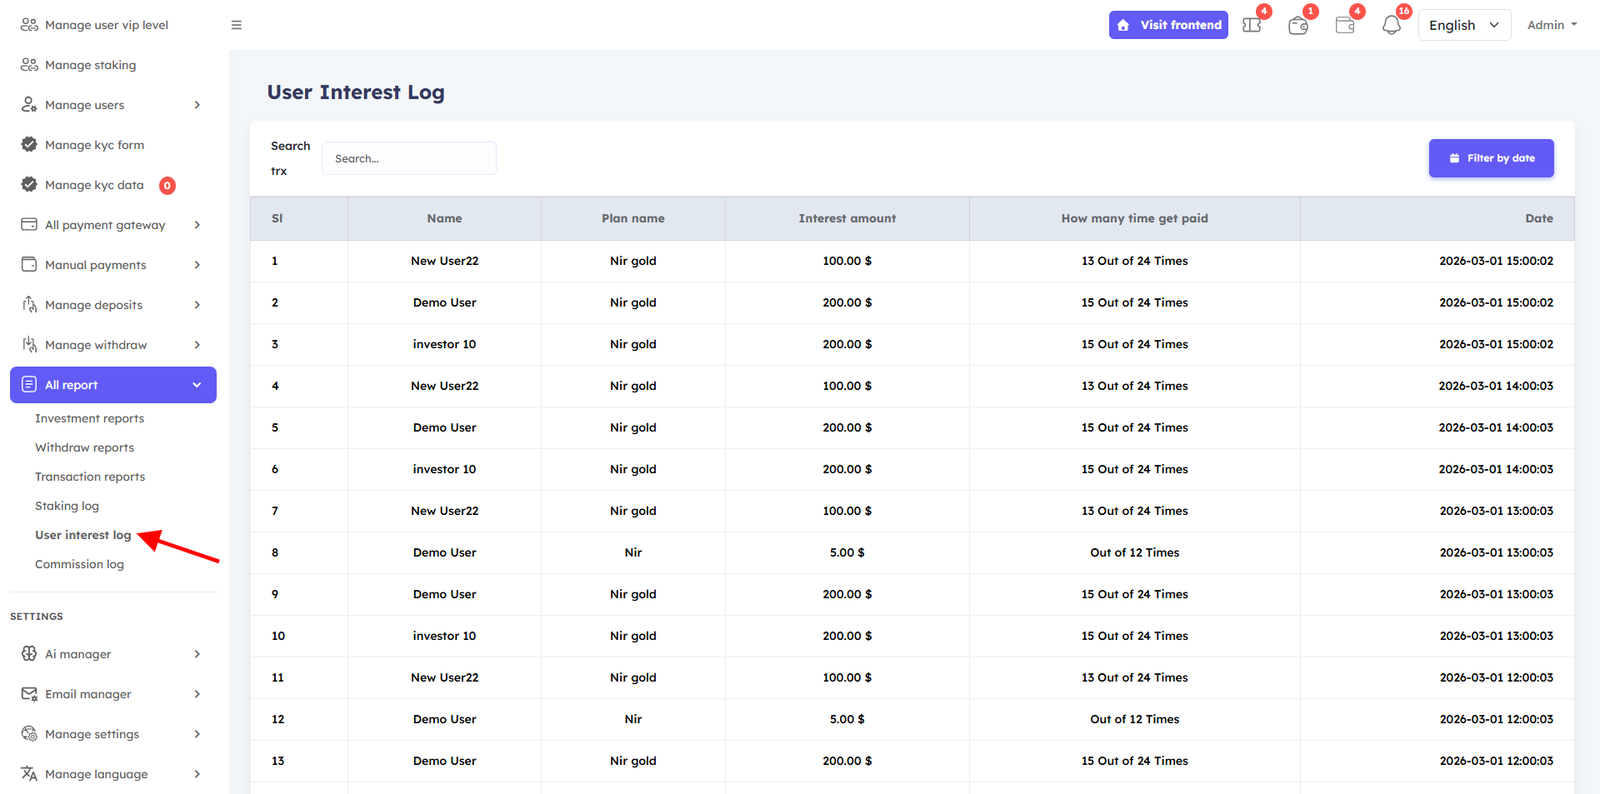
User Interest Log
Track all interest payments received by each user, with full date and amount history. In the User Interest Log option, you can see all records of when a user has received interest, or you can search for a specific user to see their interest-received records.
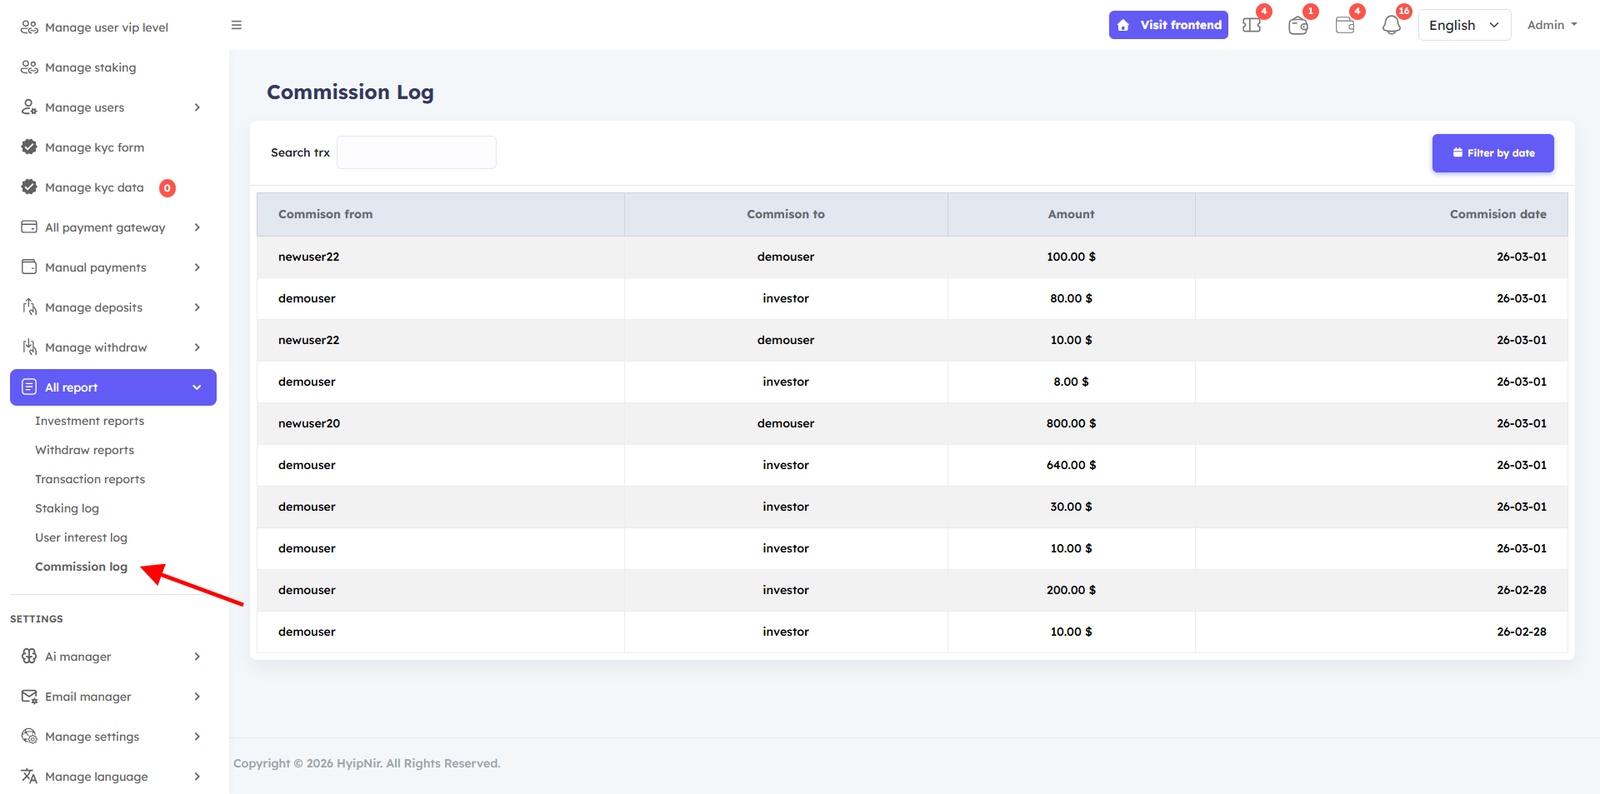
Commission Log
View all referral commissions paid, including which user referred whom and on which date. In the User Commission Log option, you can see all records of when a user has received a commission, or you can search for a specific user to see their commission-received records. And you can see which user received the commission from which user and on what date.
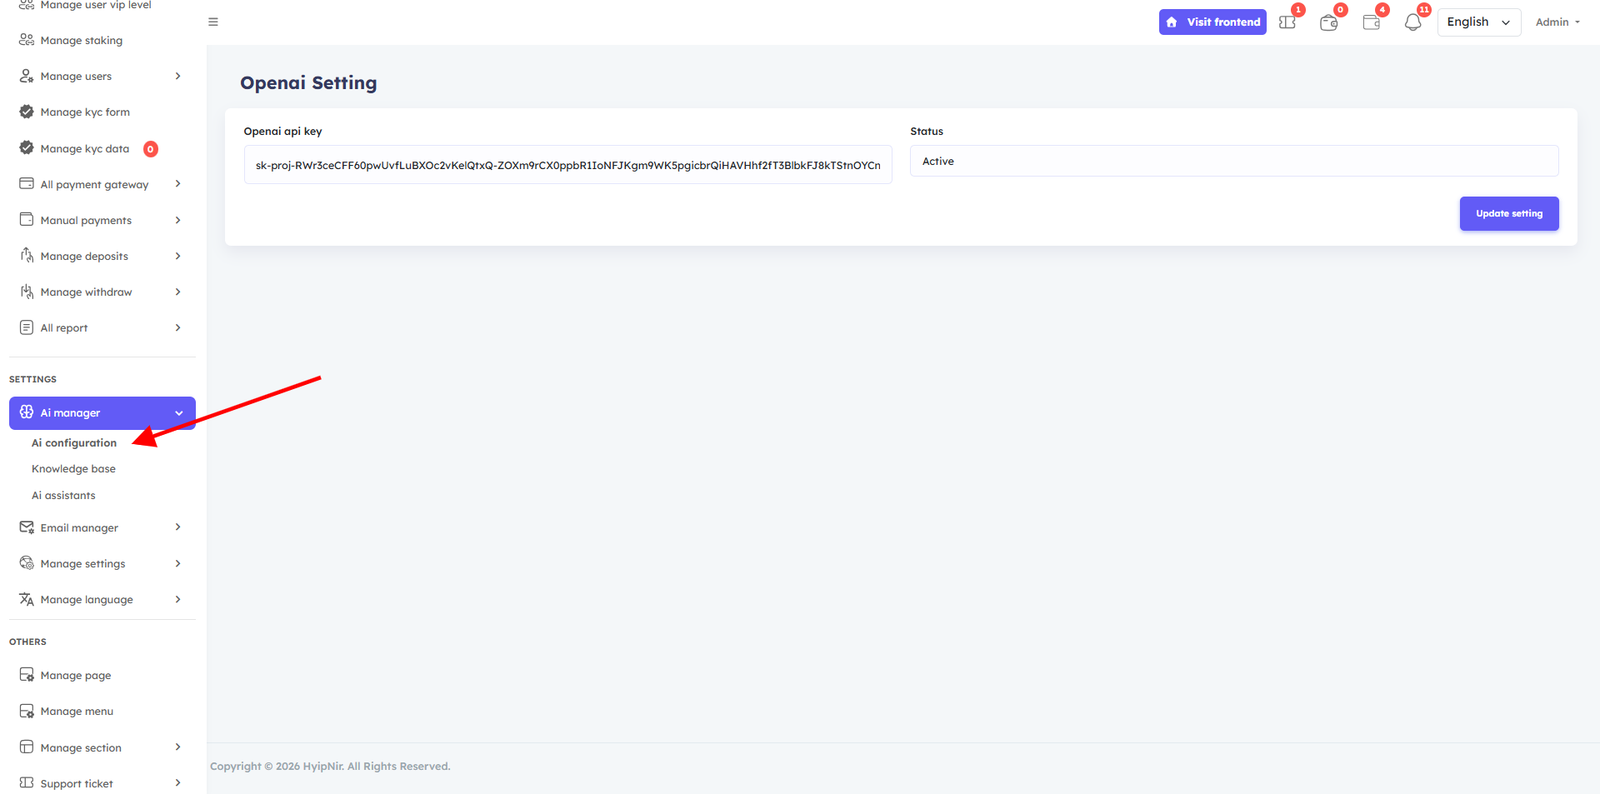
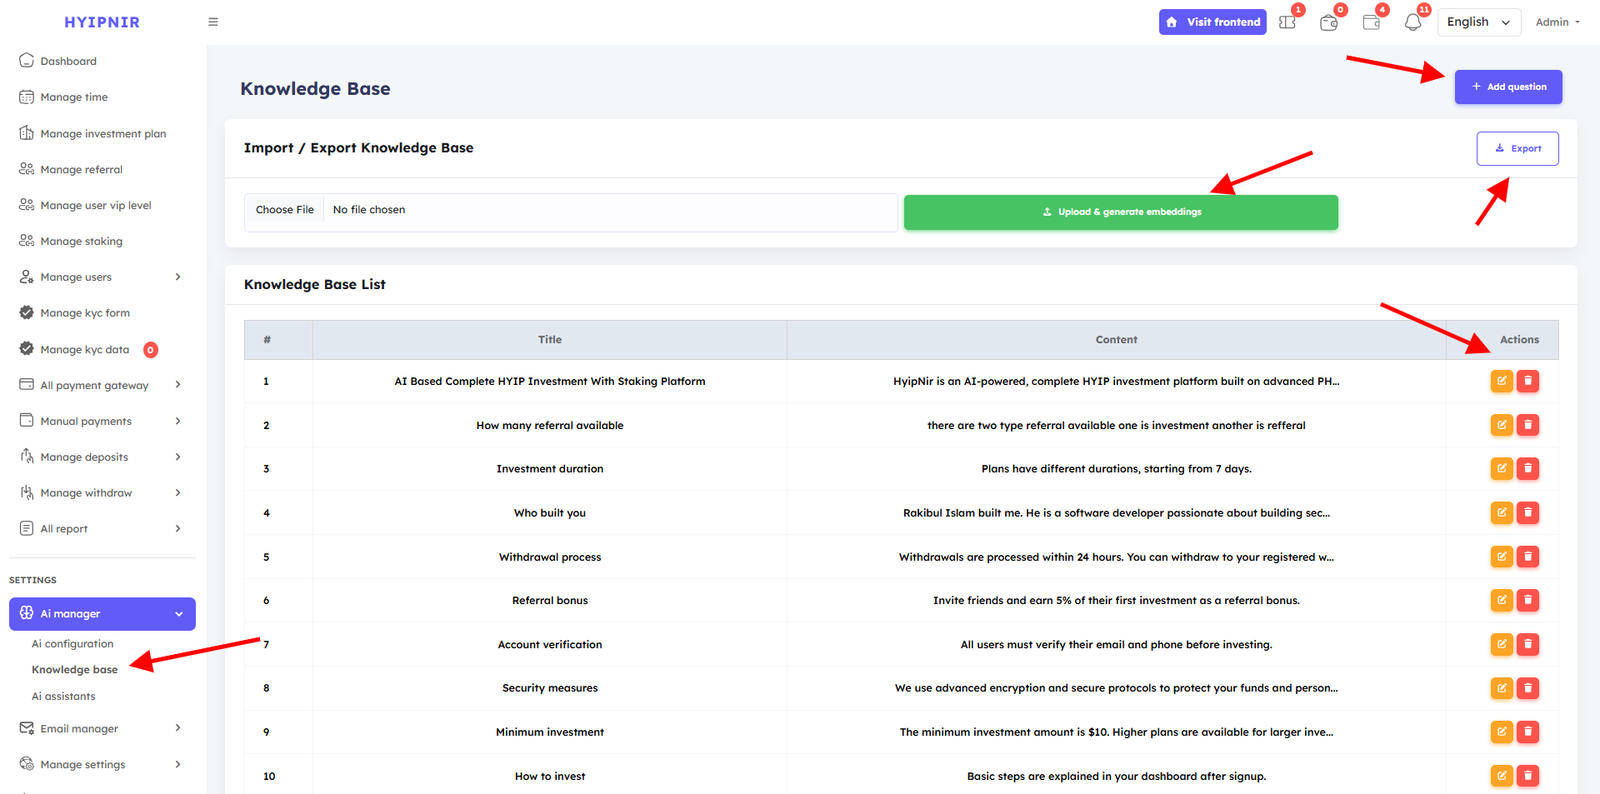
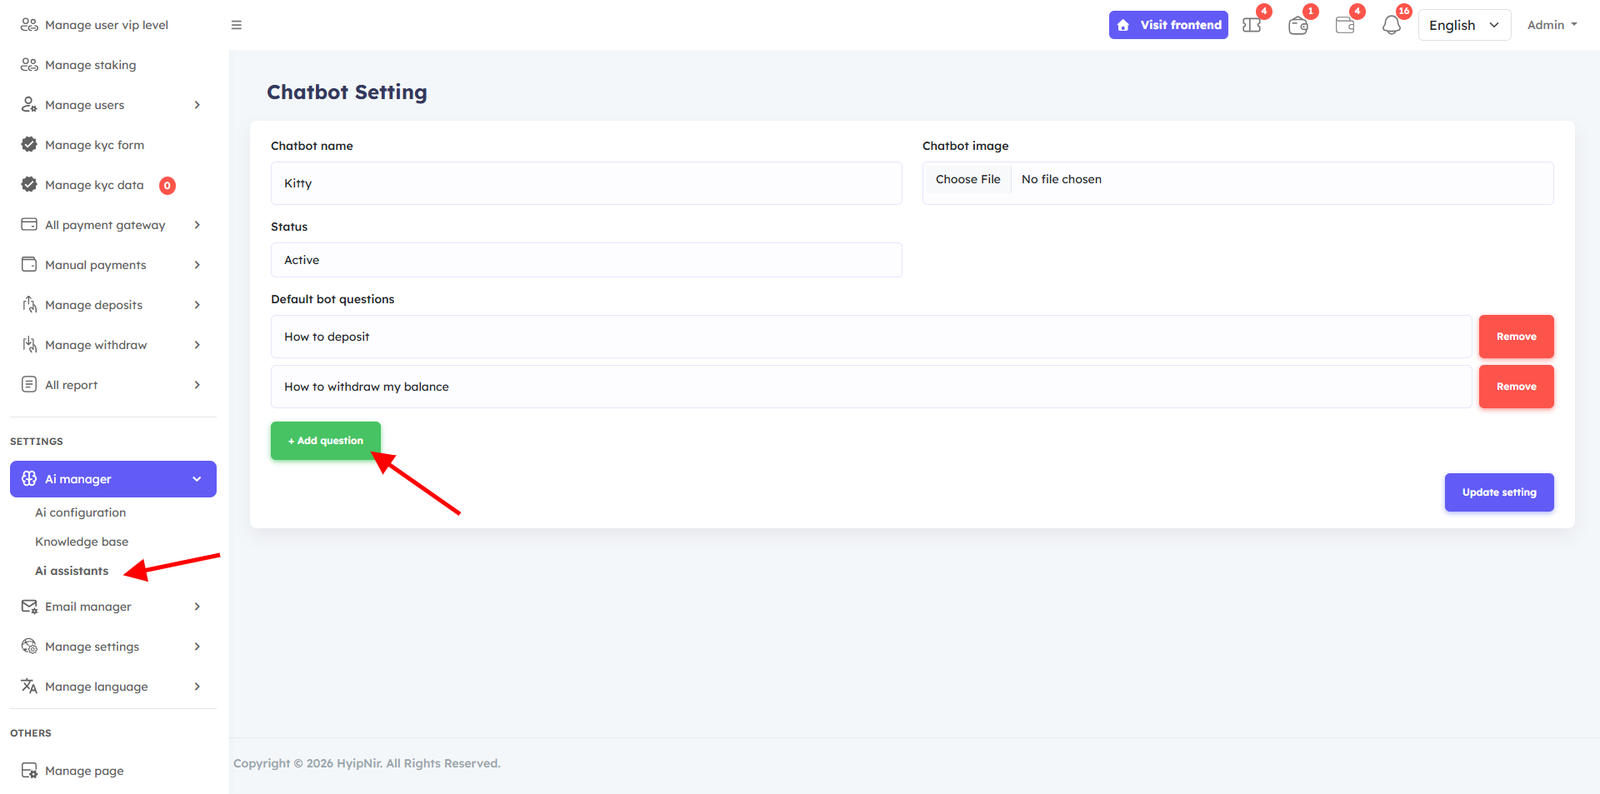
Ai manager
HyipNir AI includes a powerful AI Manager Panel that allows you to fully control and customize your AI system according to your business needs. From the AI Manager option, you can control the configuration of the AI and update everything this assistant needs because you will provide information according to your needs. This will provide accurate information to the customers and attract investors to your website.
Email Manager
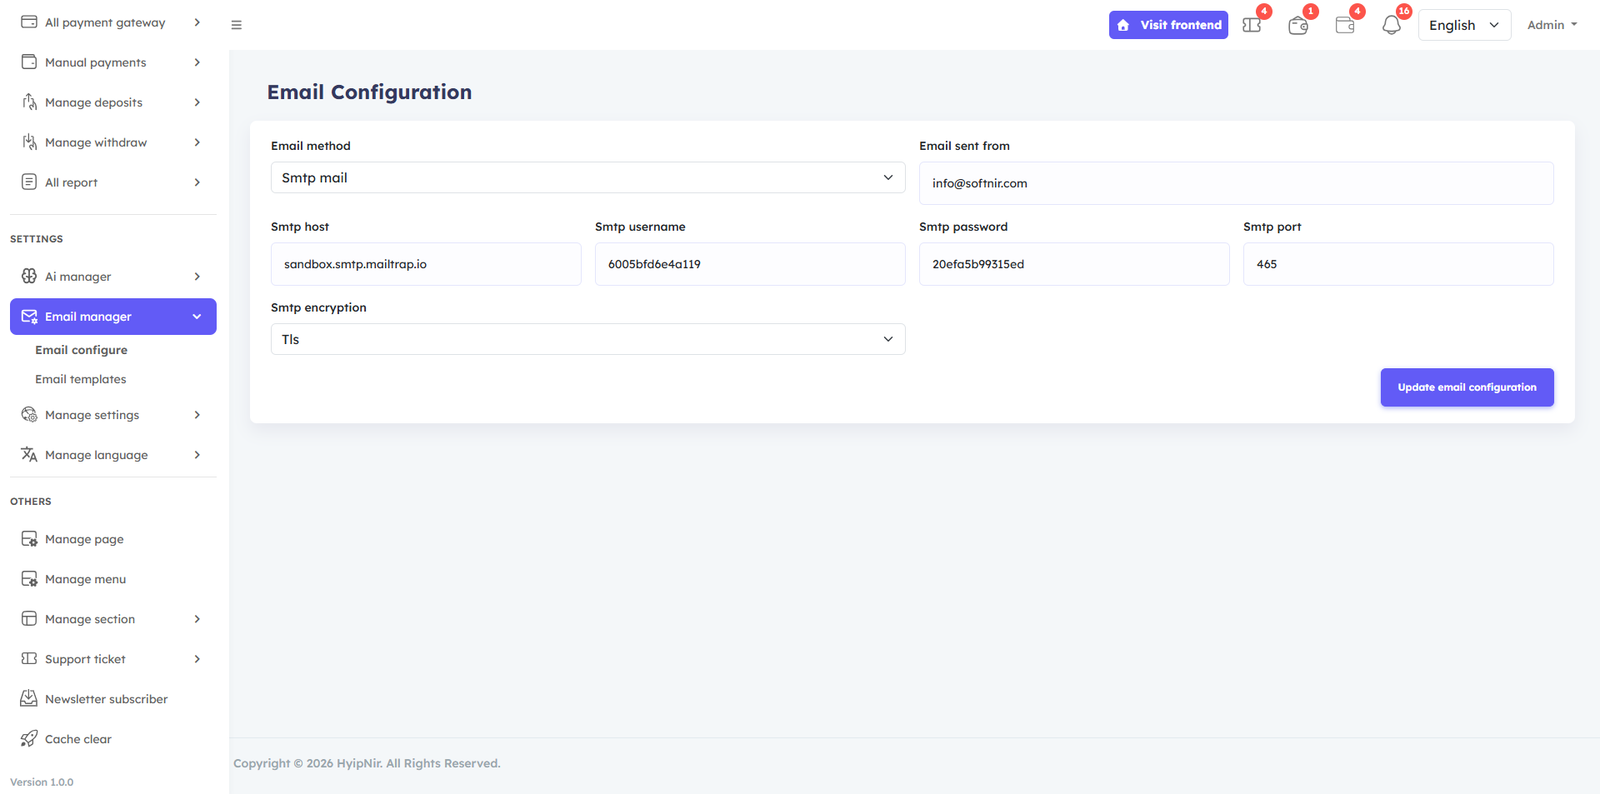
Configure two email methods: PHP Mail and SMTP Mail. For PHP Mail, simply set your server email and save. For SMTP, enter your SMTP server credentials. Customize all email templates and notification messages directly from this panel.
Email manager option, 2 options available, Email configure and Email templates. You can edit and update your emails and notifications in the Email template if you want. There are 2 Email method in the Email configure: - 1: Phpmail, 2 :Smtp mail . To use Phpmail, you just need seleted Phpmail next set your server email and click the Update email configuration button. server email example : info@domainname.com To use SMTP mail, first you need to select SMTP mail. Then you need to fill in the options that you will see. The information must be specific email information for your server email.
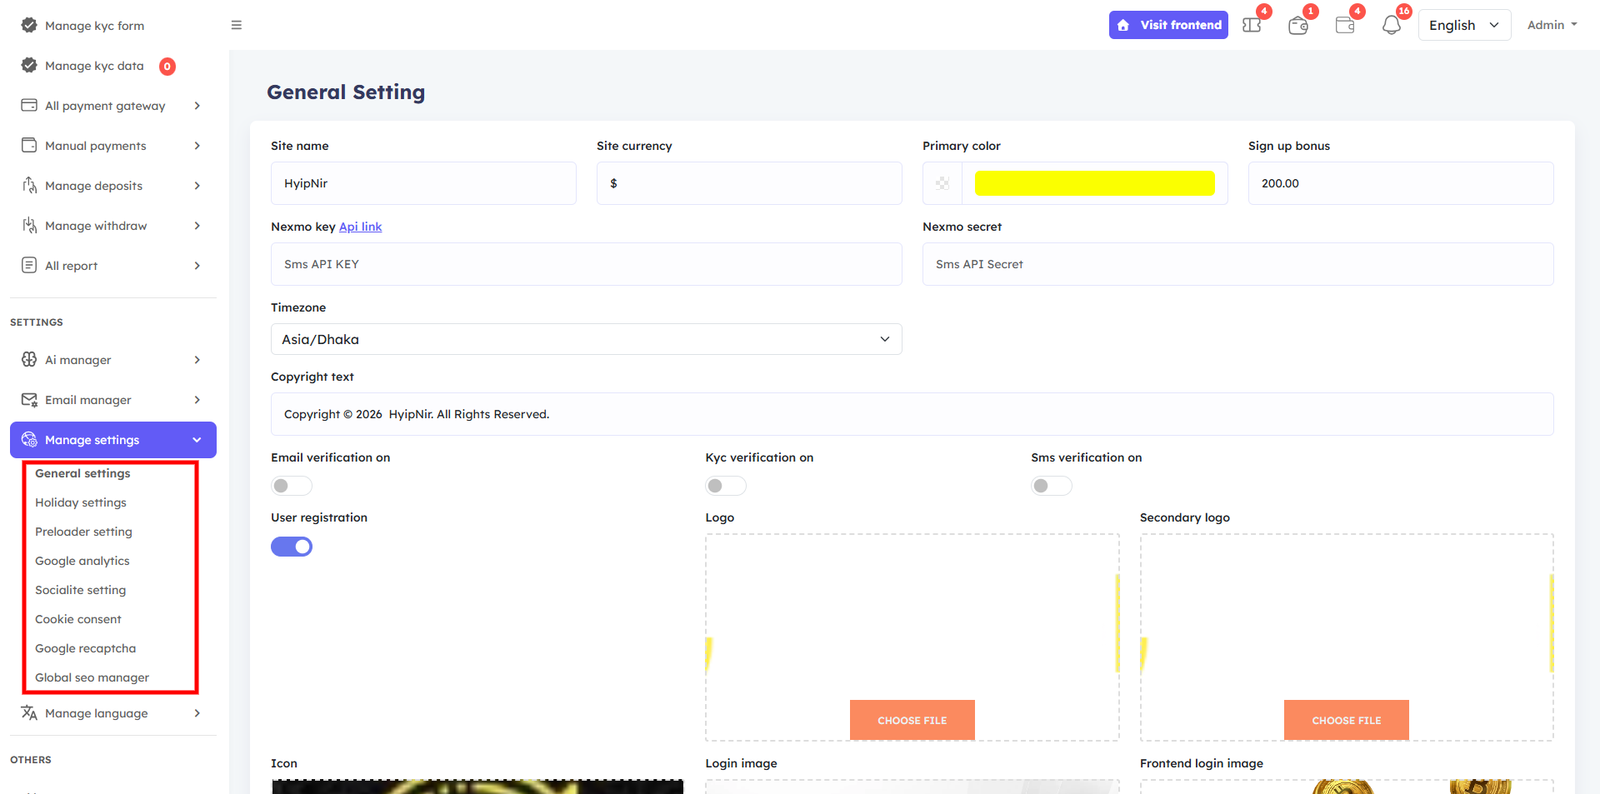
General Settings
The Settings panel contains all global configuration options for your platform. The available options in the Manage settings option are General settings, Preload setting, Google Analytics, Socialite setting, Cookie consent, Google Recaptcha, and Global SEO Manager
General Settings
Set your Site Name, Currency, Primary Color, Signup Bonus, Timezone, Copyright Text, Logo, and login/registration images. Also configure Nexmo SMS with your API key for SMS verification. Toggle Email Verification, SMS Verification, and User Registration on or off with a single click.
From the General setting, you can set, Site name , Site currency, Primary color , and Sign up bonus , Timezone , Copyright text, logo icon and all login User registra image and You can customize it as per your wish and click on the Update General button to save it . Another option in General Settings is Nexmo SMS. You need to login to your Nexmo account and set the Nexmo API key and Nexmo secret and then Update General button to save it There are three button in the general settings: Email verification on, Sms verification on, andUser registration. You can turn on any of them if you want to allow them, and you can turn them off or on by clicking on the button.
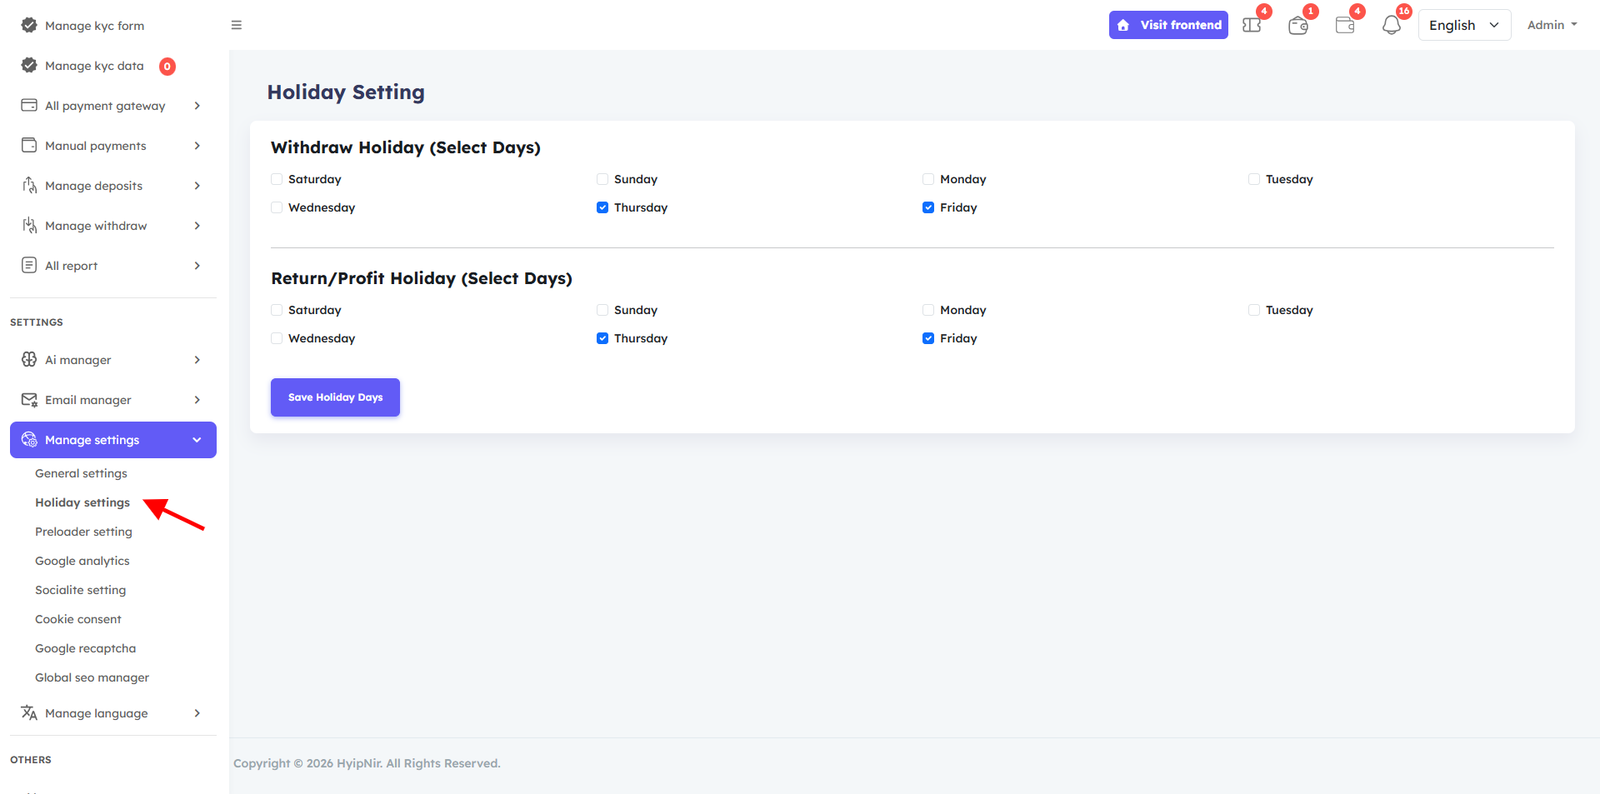
Holiday Settings
Set withdrawal holidays and profit return holidays to maintain business professionalism. Enable or disable specific days for withdrawals or profit returns — this builds user trust by establishing clear, scheduled business operating days.
From the holiday settings, the admin can easily set the website's withdrawal holiday and return profit holiday as desired. He can turn it off with just a check mark, and if the check mark is removed, it will remain on, and the customers will get a profit accordingly. This will maintain the company's professionalism because it is not available every day. Withdrawals will only be possible on days when the office is available, and they will be able to close the days on which they do not return profits. This will increase the trust of customers and help them run the business professionally.
Other Settings
- Preloader — Show or hide the site preloader animation. If you are showing the Preloader website, select this yes and update it. If you are not showing it on the website, select No and update it.
- Google Analytics — Paste your Analytics ID to enable tracking. If you need Google analytic, paste the your Analytics id here and select Yes then update. If you don't need it, select No and update.
- Social Login — Allow users to register/login via Google or Facebook. This option allows users to login and register via Google email and Facebook account . If you want to use this option, you need to add Google client id and Facebook client id and Facebook callback url and update it with Active Status. If you don't want to use it, you can Inactive it.
- Cookie Consent — Enable and customize your cookie consent modal. You can turn the Allow cookie modal on or off by selecting Yes or No and you can change the contents in the cookie text button and save the cookie . You can also customize it. cookie modal short description
- Google reCAPTCHA — Add reCAPTCHA protection to forms. If you want to use Google recaptcha on your website, select Yes on the select button and set the Recaptcha key and Recaptcha secret and click on the Update button. If you want to turn it off, select No and update.
- Global SEO Manager — Set site-wide SEO keywords and meta content. You can type different types of keyword content here that will help with your website's SEO.
Manage Language
Manage Page and Manage Language. Both Options Work the Same Way Just like Manage Page, the Manage Language option follows the same simple, step-by-step process — easy to use, no technical knowledge required.
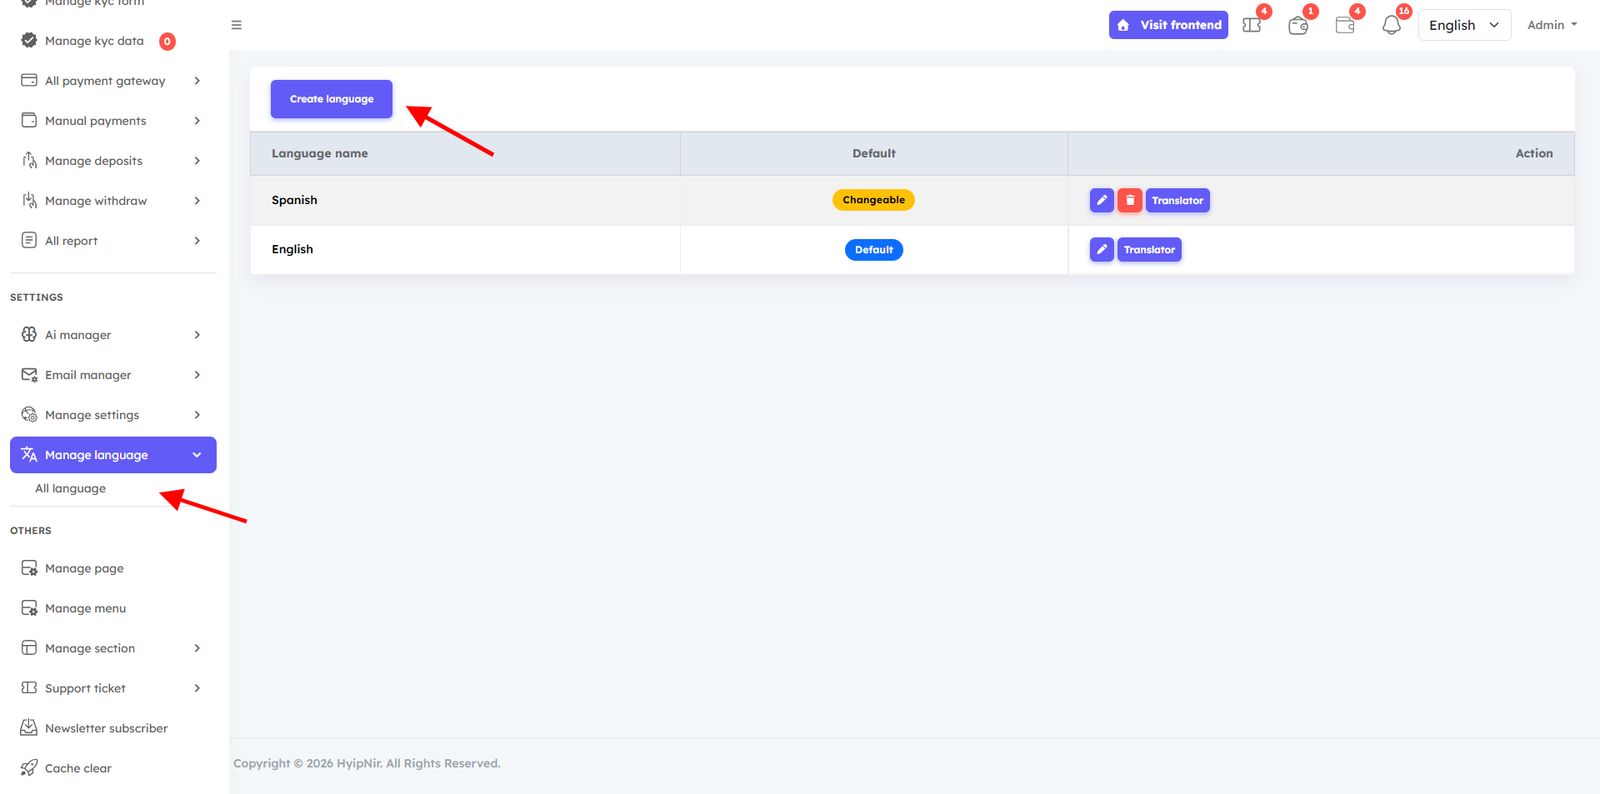
Step 1 — Create Language
Click Create Language, enter the Language Name and Short Code, then click Create. Your new language is ready.
In Manage language, you can add or delete languages As you wish and if necessary, if you want to add a new language, then first you have to click on the Create Language button and then see the language name and language short code. After typing the language name and language short code, click on the create button. Your new language will be created.
Step 2 — Create Page Under Language
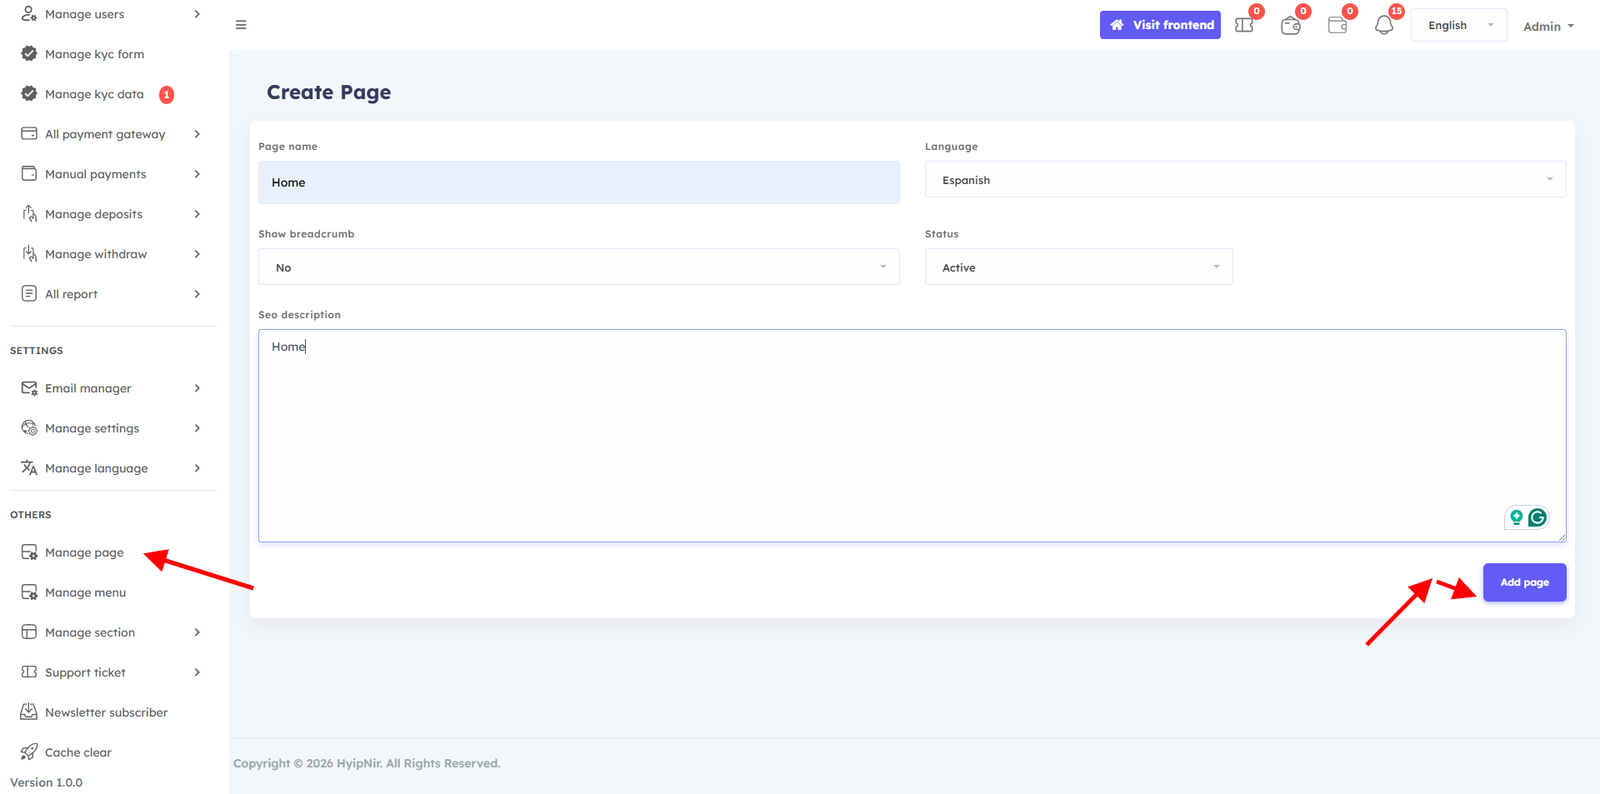
Go to Manage Page, set the page name, select your new language, add an SEO description, and click Add Page.
You go back to the Manage Page option and Set your page name. If you don't want the breadcrumb section, adjust the breadcrumb status accordingly. Select the language under which you want to create the new page. write an SEO description for the page and click the Add page button. Successfully, the page has been created under your language.
Step 3 — Edit Page Content
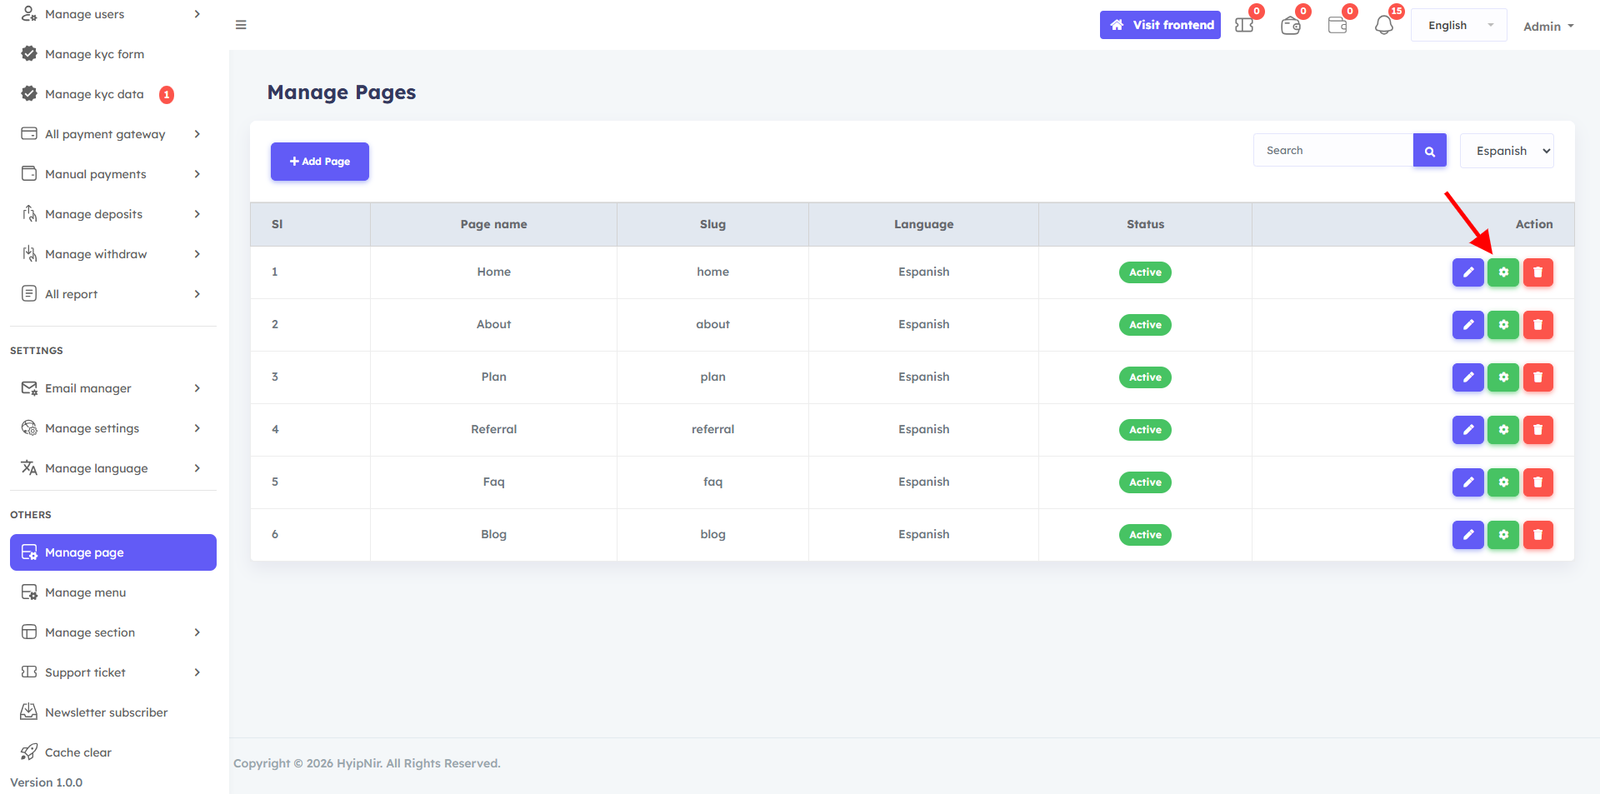
Go to Manage Pages, select your language, view the page, click Content, customize it as needed, and save.
Go back to the Manage Pages option . select the language which under you created the new page. Then you will be able to view the page. Click on the content button and it will take you to a new page. On that page, arrange the page as you wish and click on the save button,
Step 4 — Translate Remaining Content
After page setup, go to your website frontend, select the new language, reload, then return to the admin dashboard. Click the Translate button next to your language to translate all remaining content.
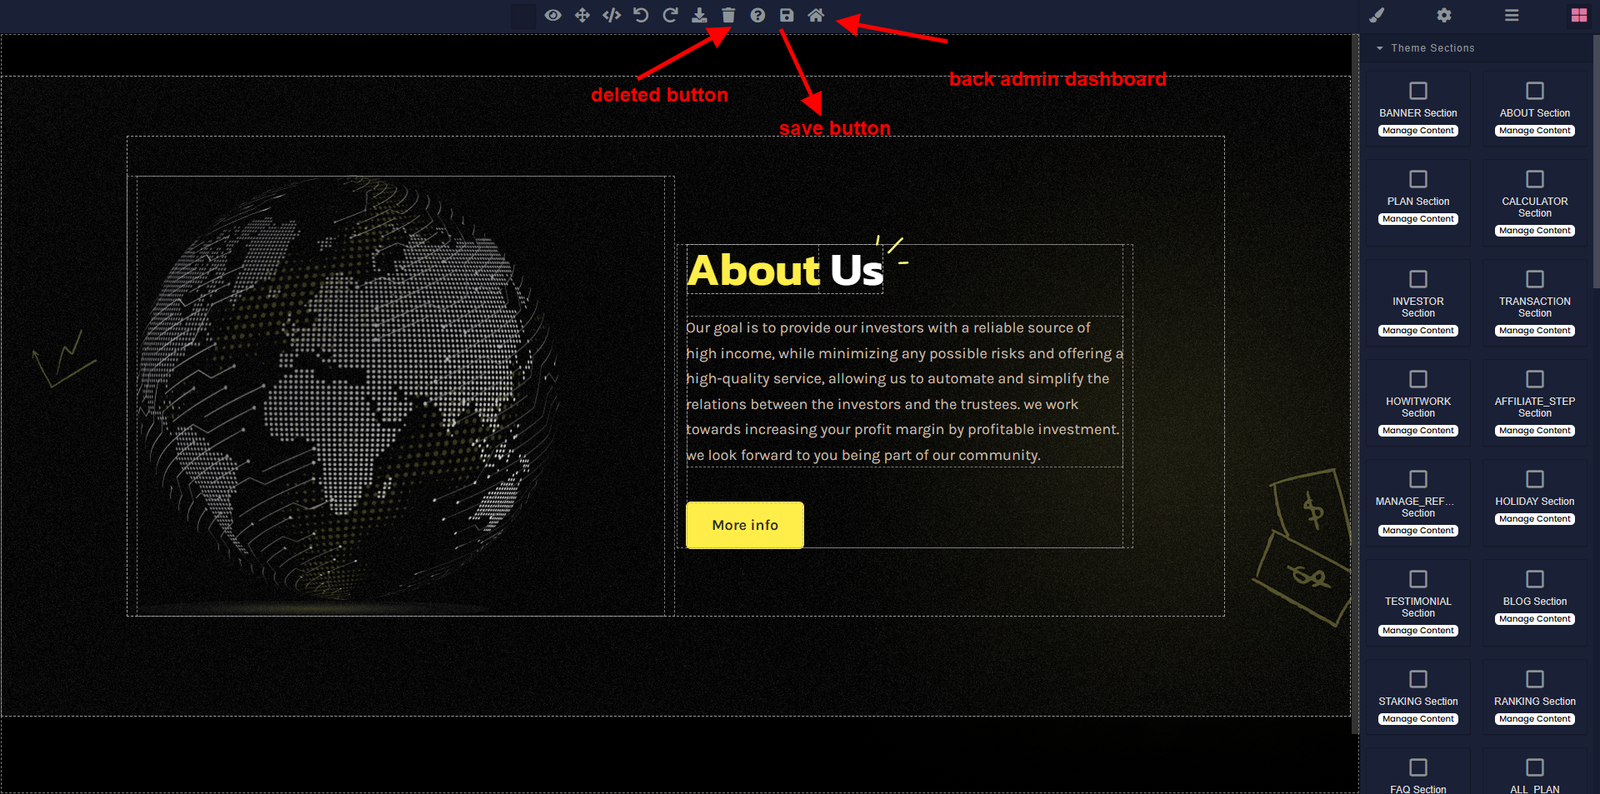
Click on the content button and it will take you to a new page. On that page, Customize the page as you wish and click on the save button, then click on the back button to return to the admin dashboard. Type the content according to the language under which you created the page.You won't be able to edit content in some sections of the default design we've made for you, so you'll have to leave it as is.
After successfully completing the language create page create and page customization and menu customization,Then you go to the website on your frontend and select the new language .you select and reload it. Then you come back to the admin dashboard and you will see a translate button your new language next you can Click on translate button it. Then you can view the English or default content of your website. Then you will see all your default content there. You need to translate the content. You must translate specific content. You will get specific. Update your translation according to the language you created. You could not translate some content in the page customize option.You can translate those contents from here. admin dashboard user dashboard can translate. Then your language will work.
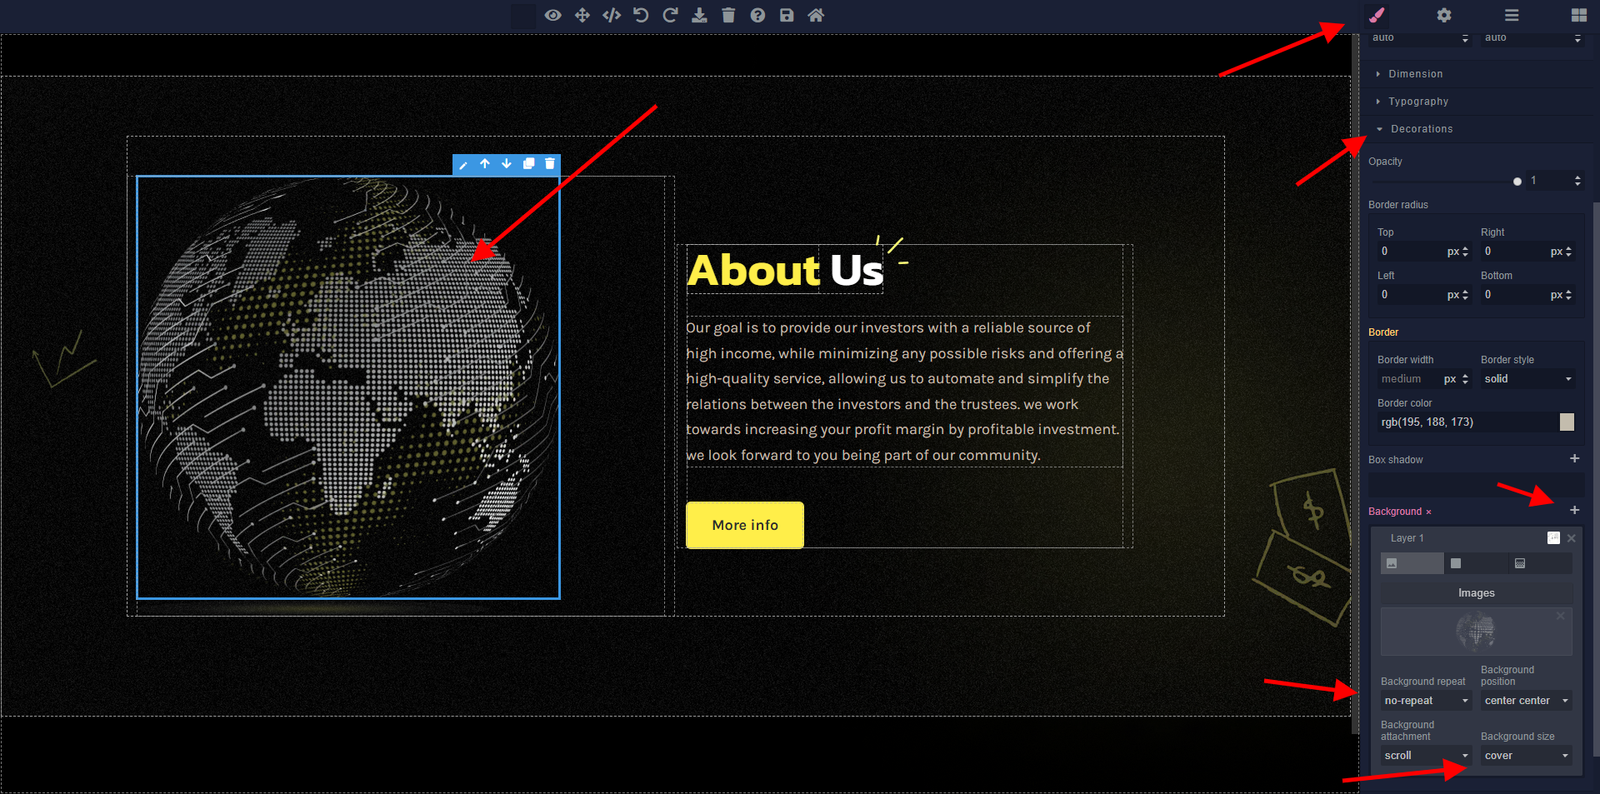
Page Image Management. Customize the page image update delete
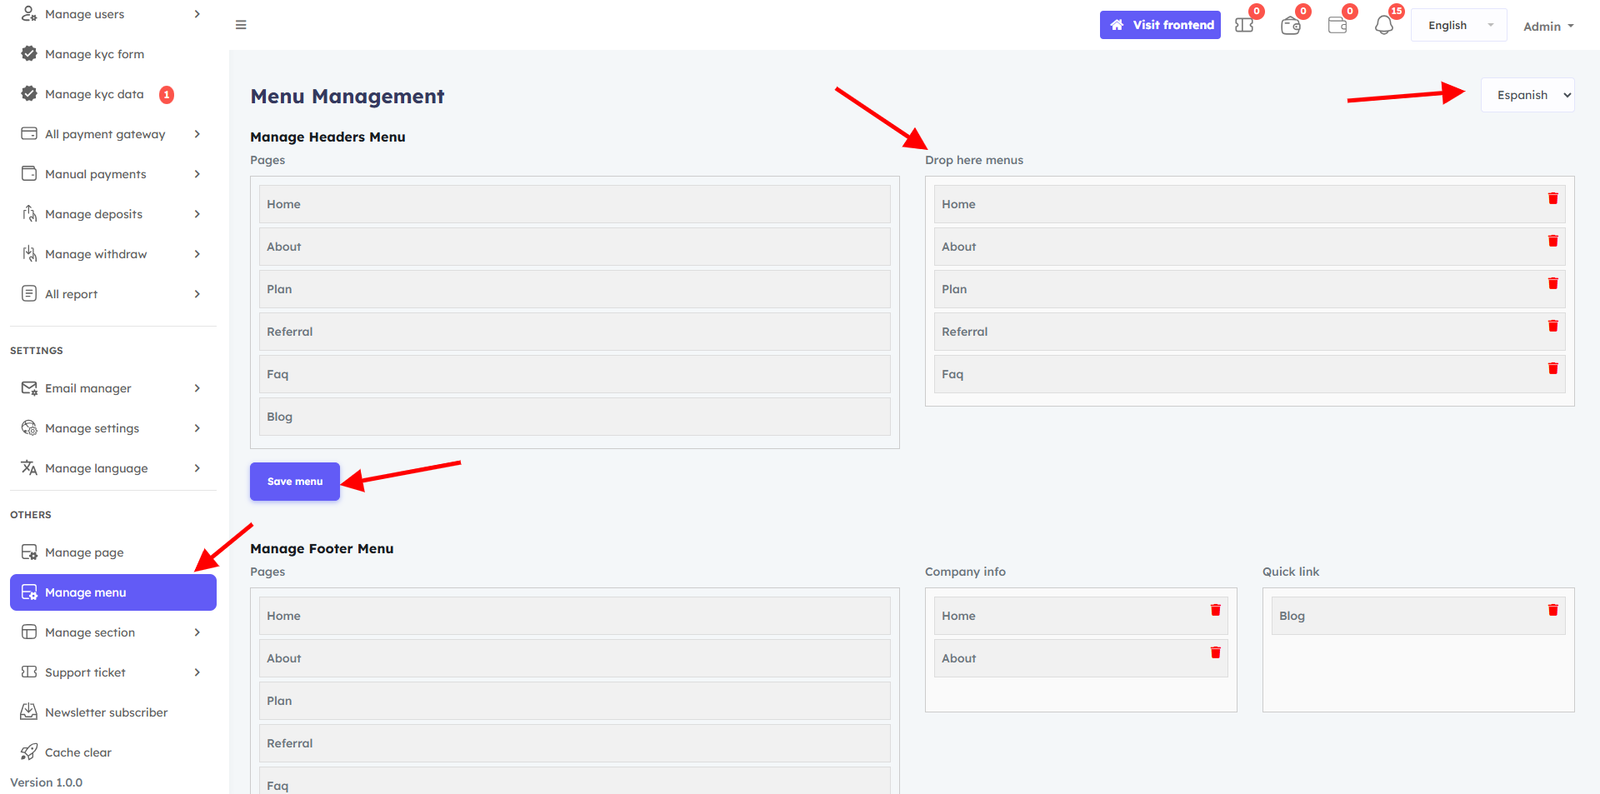
Step 5 — Configure Menu
Go to Manage Menu, select your language, then drag and drop pages to configure your Header and Footer menus. Click Save when done. Go back to the Manage menu option . Select the language you want to organize the menu under.After selecting the language, you can view the pages under the language. You can easily drag and drop menu items from left to right to configure the header menus and Footer manu according to your preferences and click the save button.
Manage Page
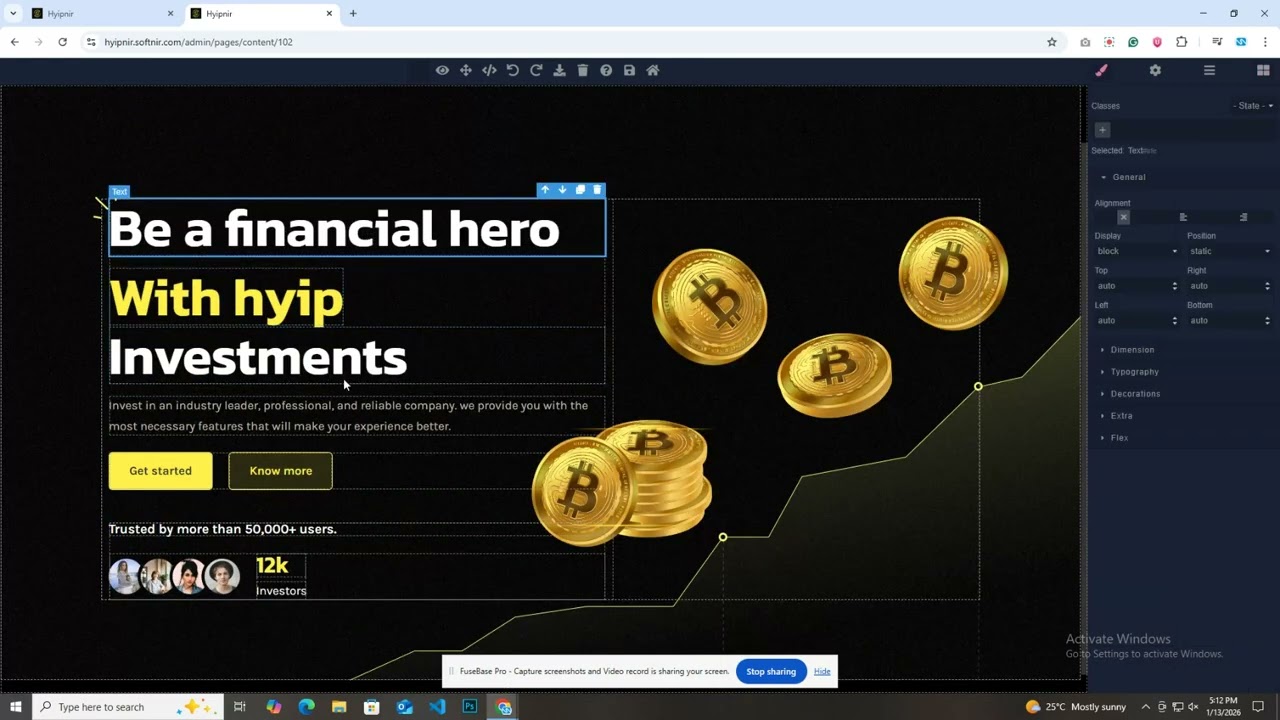
The Manage Page feature provides full dynamic content management. Add text, images, and videos via section blocks, alter layouts, and use SEO-friendly URL prefixes — all without any coding knowledge.
Dynamic content management is provided by the Manage page in the Admin panel, which enables administrators to quickly update and change page content as necessary. By inserting section blocks, you can add different items, such as text, images, and videos, and alter layouts. This adaptability guarantees that your website stays interesting and dynamic, enabling you to react swiftly to modifications and efficiently convey information to your users. Additionally, you can improve your site's search engine presence while keeping it user-friendly by using SEO-friendly URL prefixes.
Manage Page and Manage Language. Both Options Work the Same Way Just like Manage Page, the Manage Language option follows the same simple, step-by-step process — easy to use, no technical knowledge required.
- Go to Manage Page, set page name, select language, add SEO description, click Add Page.
- Select your language and find the new page. Click Content to open the editor.
- Customize all content blocks as needed and click Save.
- Go to Manage Menu, select your language, and drag pages into your Header/Footer menu. Click Save.
Step 1:
Manage Page option and Set your page name. If you don't want the breadcrumb section, adjust the breadcrumb status accordingly. Select the language under which you want to create the new page. write an SEO description for the page and click the Add page button. Successfully, the page has been created under your language.
Step 2:
Go back to the Manage Pages option . select the language which under you created the new page. Then you will be able to view the page. Click on the content button and it will take you to a new page. On that page, arrange the page as you wish and click on the save button,
Step 3:
Click on the content button and it will take you to a new page. On that page, Customize the page as you wish and click on the save button, then click on the back button to return to the admin dashboard.
Customize the page image update delete
Step 4:
Go back to the Manage menu option . Select the language you want to organize the menu under.After selecting the language, you can view the pages under the language. You can easily drag and drop menu items from left to right to configure the header menus and Footer manu according to your preferences and click the save button.
You have successfully setup the language and page, now if you go to the frontend of the website and change the language, you will be able to see your website. The language is working properly.
Manage Menu
Easily arrange your Header and Footer navigation using a simple drag-and-drop interface. Select a language, drag pages from the available list into your desired menu position, add external links if needed, and save.
The admin can easily inspect and arrange the generated menu list using the Manage Menu tool in the Admin panel. To customize the header or footer menus to your liking, simply drag and drop menu items from left to right. Because of this versatility, you may make unique menus and include external connections to improve the front-end navigation and user experience. The structure of your website will be customized to your needs thanks to this user-friendly management system, which also makes it simpler for visitors to locate pertinent content. .
Drag and drop pages from left to right to configure your header navigation. Click Save when done. You can easily drag and drop menu items from left to right to configure the header menus according to your preferences and click the save button.
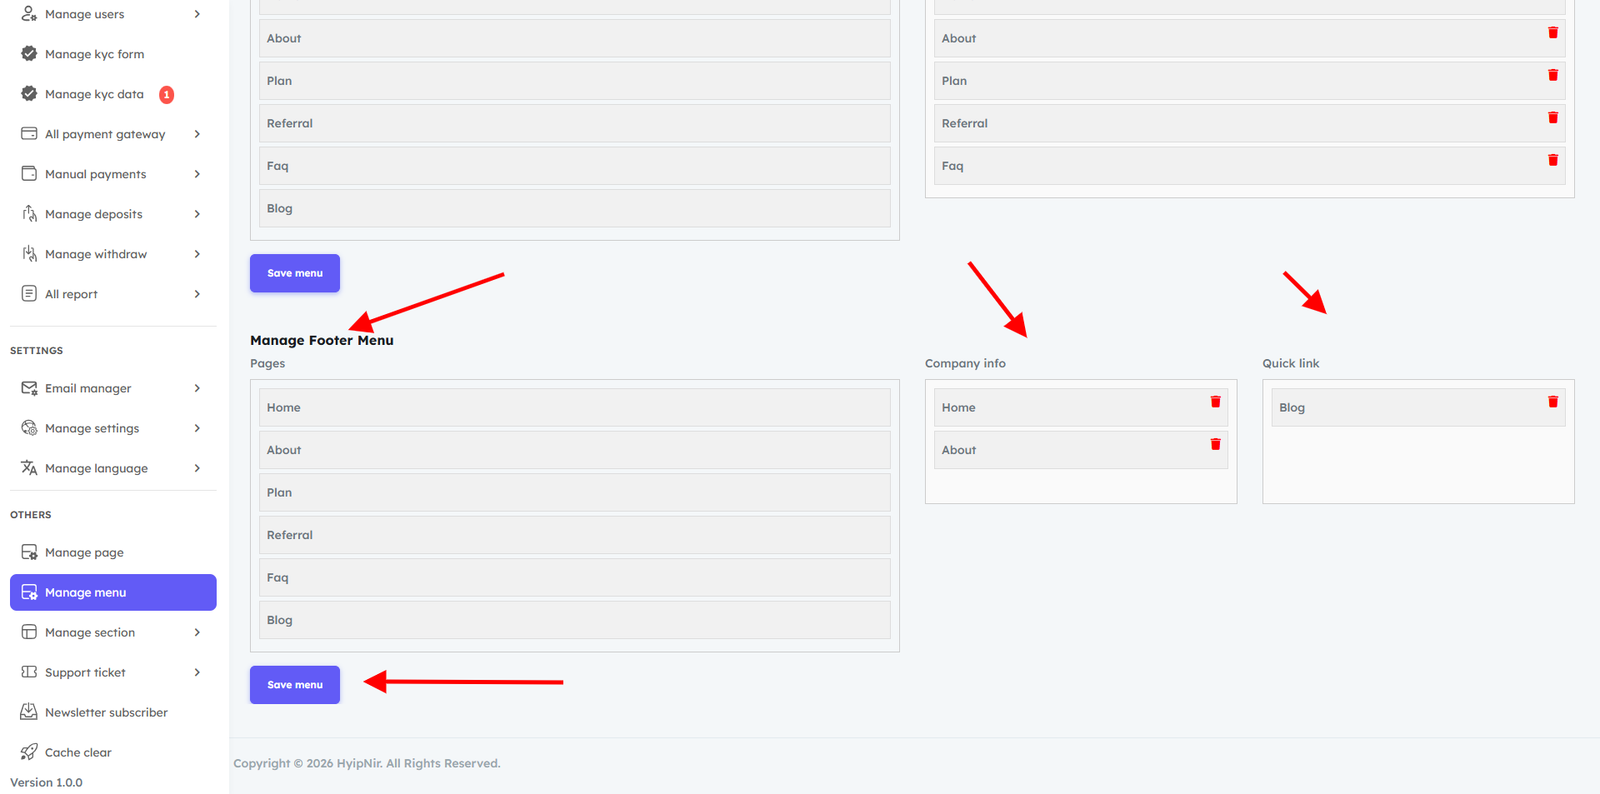
Drag and drop pages from left to right to configure your footer navigation. Click Save when done. You can easily drag and drop menu items from left to right to configure the footer menus according to your preferences and click the save button.
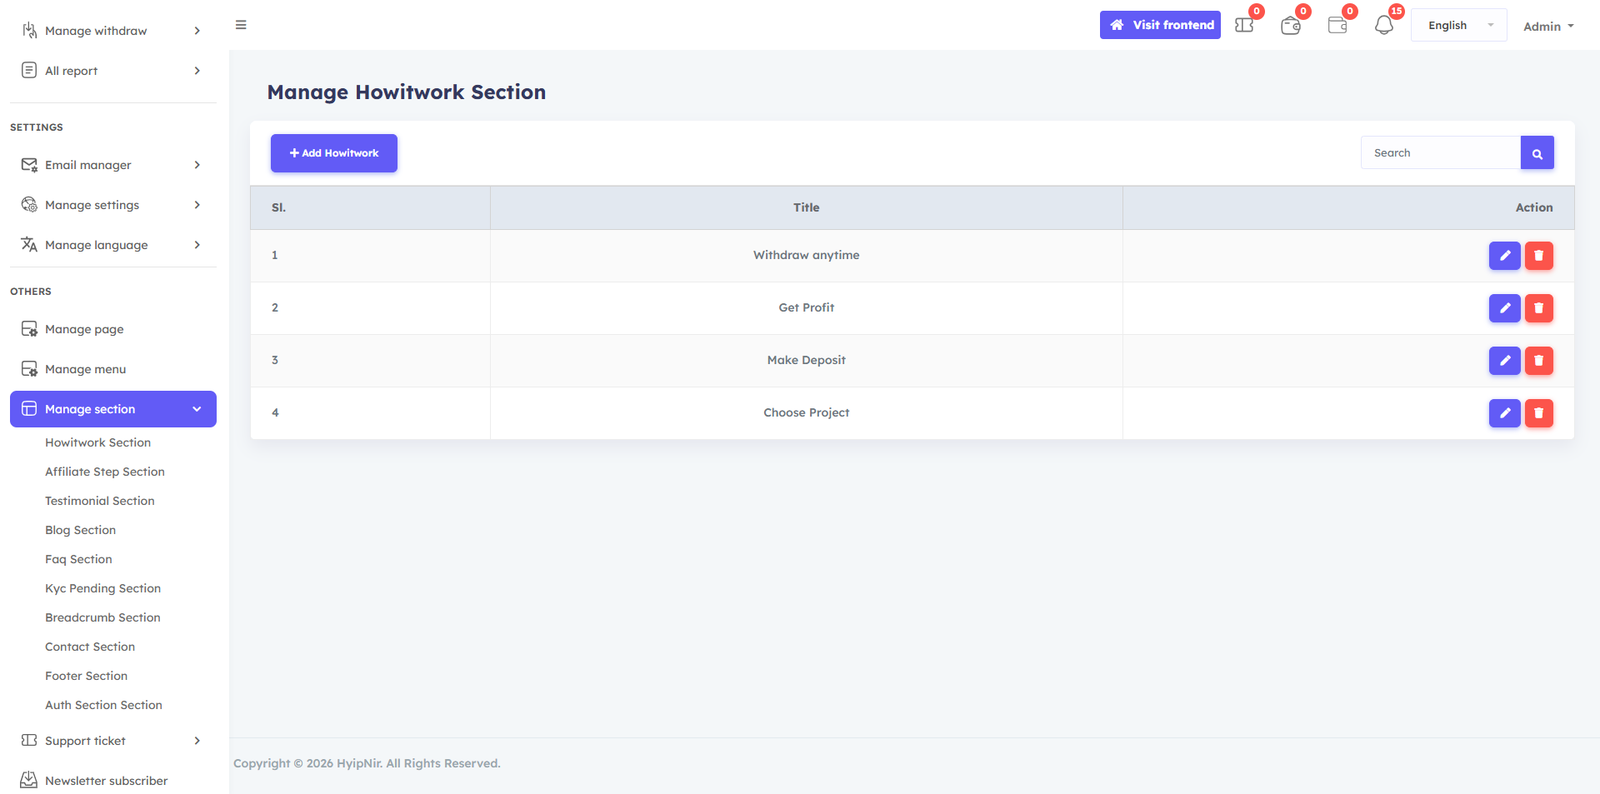
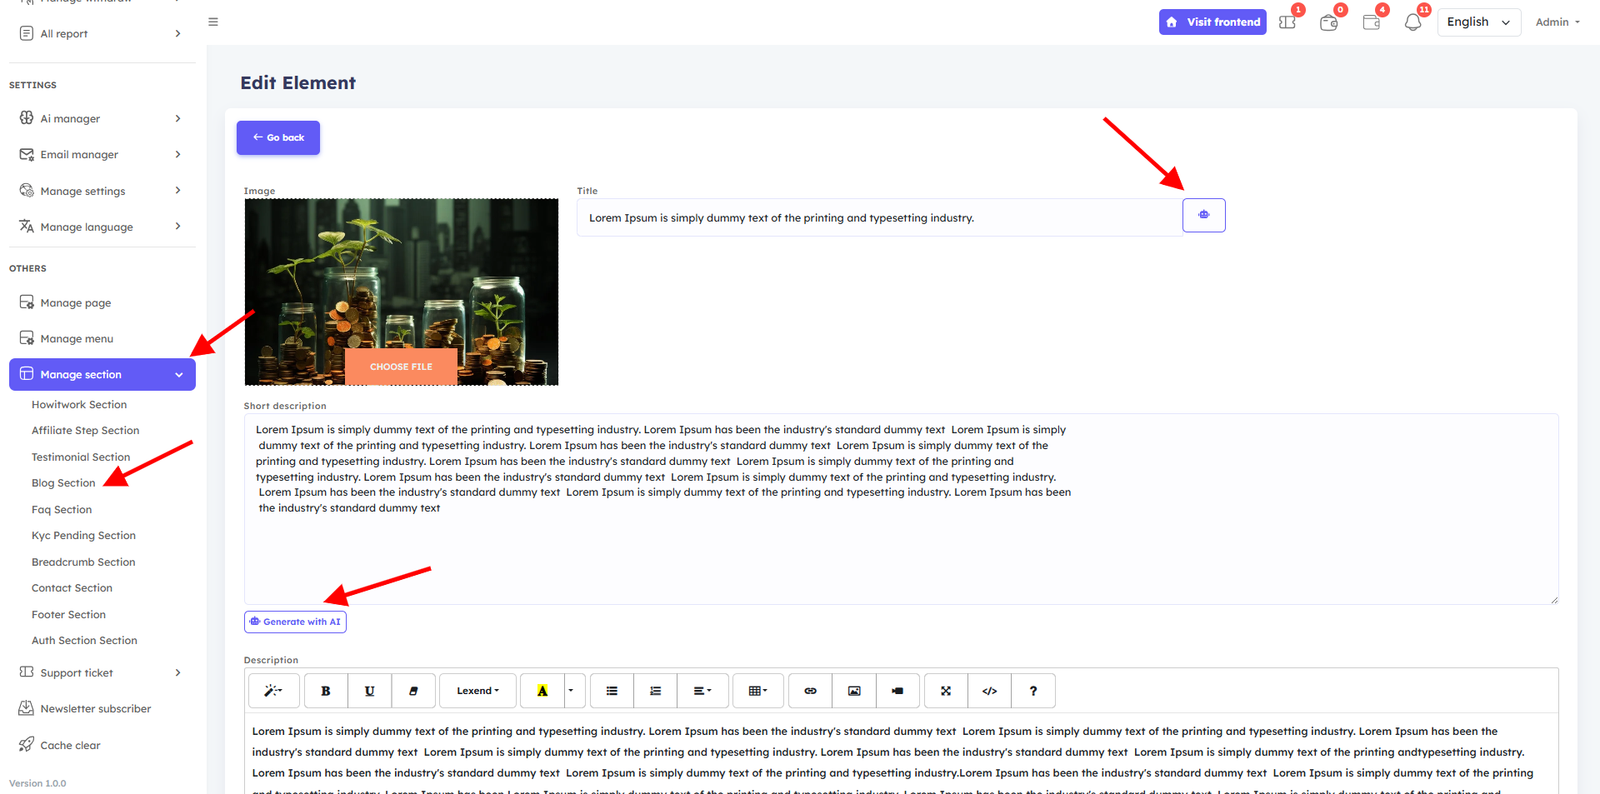
Manage Section
Customize the content of non-editable sections directly from the admin panel — no coding required. Update text, headings, and other content for any section on your pages with ease. The Manage section feature in the Admin panel allows admin to write and customize content for section on the pages . You can customize the contents of the non editable area from here as you wish. You can easily making it simple to tailor each section to your needs.
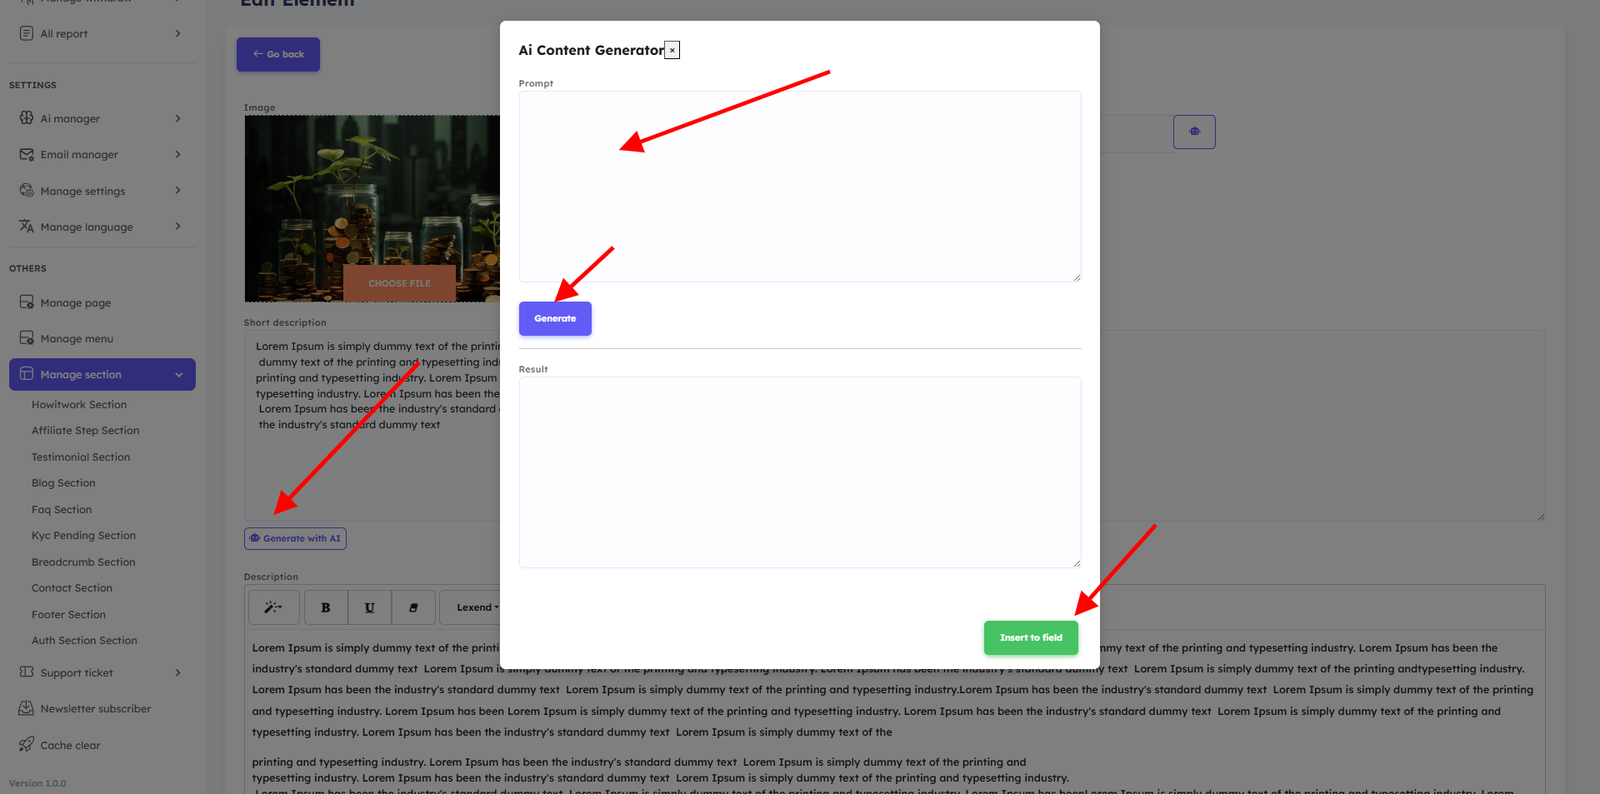
Creating AI-Generated Content for Your Section
Support Ticket
Users can submit support requests through the built-in ticket system. The admin can reply directly from the dashboard, and both parties can attach media files to their messages for faster issue resolution.

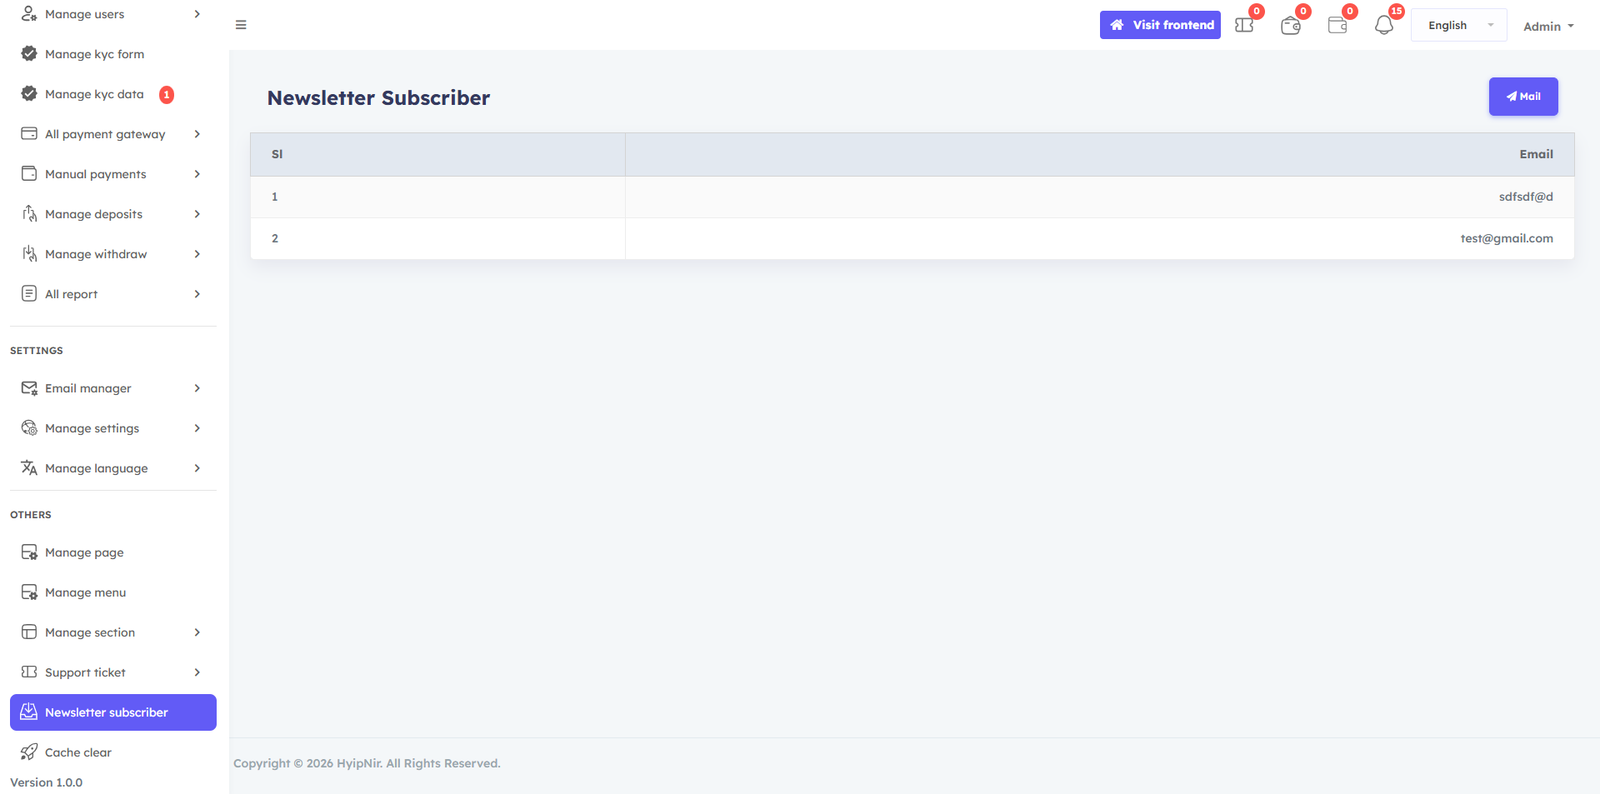
Newsletter Subscriber
View and manage all newsletter subscribers. All subscribed email addresses are listed here for easy export and marketing use.
Softnir Support
We're Here to Help
Free installation support is available for cPanel-powered web hosting. If you encounter any issue during installation or operation, reach out to us directly — we'll respond promptly.